Maximum field of view for Celestron SCT and Maksutov

January 27, 2017 // by ecuador

When I got my first 127mm Maksutov, I had not done my research and so I was a bit disappointed by the maximum possible field of view it could provide. You see, its baffle tube diameter was 27mm, which is the same as the maximum field stop for a 1.25″ eyepiece, so even with a reducer I could not get more FoV than what a 32mm Plossl provides – which is not much at a 1500mm focal length (1.03 degrees). A wider baffle tube allows you to either use 2″ eyepieces that can have a larger field stop, or a reducer without vignetting.

In the following table, I have used the baffle tube diameters from the Celestron knowledge base to calculate the maximum field of view for each of their Catadioptric OTAs (if you want to do it yourself, the formula is 57.3*field stop/focal length). The Maksutov numbers should also be valid for the Skywatcher and Orion models. I also list the eyepiece that will provide the maximum field of view without vignetting. In the case of the C11-C14, their baffle tube is larger than the maximum possible field stop for 2″ eyepieces. In the case of the C90, the tube is tiny in diameter, but not very long apparently so if you don’t mind vignetting you can almost go to the 1.3° that Celestron advertises with a 32mm Plossl.

OTA Focal Length Baffle Tube Max FoV Example Eyepiece Max Fov with no vignetting
C90 Mak1250mm15mm0.69°*25mm 50° Plossl
C127 Mak1500mm27mm1.03°32mm 50° Plossl
C51250mm27mm1.24°32mm 50° Plossl
C61500mm27mm1.03°32mm 50° Plossl
150 Mak1800mm30mm0.96°ES 70° 25mm; Panoptic 27
C82032mm37mm1.04°Panaview/SWA 32mm; ES 68° 34mm; Ethos 21
C9.252350mm46mm1.12°Panaview/SWA 38mm; ES 68° 40mm; Panoptic 41
C112800mm54mm1.1°0.94° /w 2" Panaview/SWA 28mm etc; 1.07° /w 3" ES 100° 30mm
C143910mm54mm0.79°0.67° /w 2" Panaview/SWA 28mm etc; 0.77° /w 3" ES 100° 30mm

*Due to the short tube you can apparently reach 1.3° using a 32mm Plossl with some vignetting.

As you can see, one more reason I like my C9.25 is that it can give you the maximum apparent field of view possible for a 2″ eyepiece (which goes up to a 46mm field stop), so it can actually provide a wider true field of view than either the smaller C8 or the larger C11. The C11 and C14 can take advantage of eyepieces larger than the 2″ standard to go closer to their max field of view, but you’d have to find an external focuser to take an eyepiece such as the 3″ Explore Scientific 100° 30mm.

Refractor Reducers: TeleVue TRF-2008 vs Altair Lightwave 0.8x on SW Evostar 80ED & Equinox 80 ED

January 11, 2017 // by ecuador

APO/ED refractors are great, however they do need a flattener to give you those pinpoint stars, or, even better, a reducer/flattener to also give you faster exposures and wider field at the same time. Some  refractors will have a matched reducers (especially the “slow” ones), but, for those that do not the expensive TeleVue TRF-2008 is often recommended. I thought I’d test how it actually performs using the two ED doublets I have right now, the 600mm f/7.5 Evostar 80ED and the 500mm f/6.25 Equinox 80 ED, and pit it against an inexpensive Altair Lightwave 0.8x that had gotten me curious for a while now (it looks a bit like the Orion 0.8x – no idea how similar they are).

The Reducers

Reducer Model Reduction: Spec / Actual Weight Compatibility Price
TeleVue TRF-20080.8x / 0.785x347g400-600 focal length$305 / £306
Altair Lightwave 0.8x0.8x / 0.801x170gf/6+£75
(more →)

Review: Inexpensive Solomark 50mm Guide Scopes (same as Orion, Starguider, TS etc)

December 18, 2016 // by ecuador

A popular guiding solution is the 50mm guide scope, often by converting an existing 9×50 finder scope. It has the advantage that it is light, it can fit on your existing finder shoe, it is very fast giving you many stars at low exposures and it can be quite effective at short and medium focal lengths. After getting a bit frustrated with a couple of OAGs (off-axis guiders), I looked into adapters for converting the classing 9×50 finder, however they were very expensive for what they are, and, as I found out, for a little more you can get a dedicated guide-scope that should be better suited to the task. I got two units sold by “Solomark”. Well, I got one unit actually, it was very competitively priced, came quickly, but it was the wrong one! It was obviously an honest mistake as I received a more expensive unit, but I had not read good things about guiding with helical focusers, hence I wrote them and they immediately sent me the one I ordered and told me to keep the more expensive one, so that was some great service from Solomark. But, you will also find these guide-scopes sold under various names, sometimes with minor differences and for varying prices. Let’s have a look at them:

Solomark 50mm Mini Guide Scope

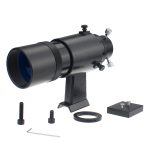
If it seems familiar, that’s because it is identical to the Orion 50mm mini guider (including all the accessories that come with the Orion). In fact, my unit came marked as “Starguider”, which is how Agena brands their own version, and there is also a TS (Teleskop-Service) version. The optics look good and construction is metal except the 3 adjustment screws, but relatively light at 496g including the stand which fits snuggly on the usual skywatcher/celestron etc finder-scope shoe (a shoe is also included if don’t have one).
Focusing is a bit awkward: you focus roughly by manually sliding your camera into the tube as much as required and tightening (you can attach the provided parfocal ring to not have to repeat this) and then you can adjust a bit by rotating the front part which can move the objective by a few mm. Due to this limited focus travel, to focus with an eyepiece (i.e. to use this as a regular finderscope) you need a small extension. I also tried a 1.25″ diagonal, but that added too much distance so I could not get focus with an eyepiece, so you are quite limited if you expected to swap the camera with an eyepiece now and then.
I don’t see a way to remove the guide scope from the holding bracket (in case you wanted to upgrade the bracket or the scope) and the 3 adjustment screws provide very little travel, although I doubt you’d have a problem finding a guide star with a decent guide camera.
The specs claim 162mm f/3.2, however plate-solving with a QHY5L-IIm camera gave me 183mm. This is actually a bit more useful, as at f/3.66 it is still really fast, but the extra focal length is welcome.
Where to buy: Right now I see the Solomark out of stock, but you can get the Orion version at a decent price from Amazon.com or Amazon.co.uk. There is also the StarGuider version on ebay.com.

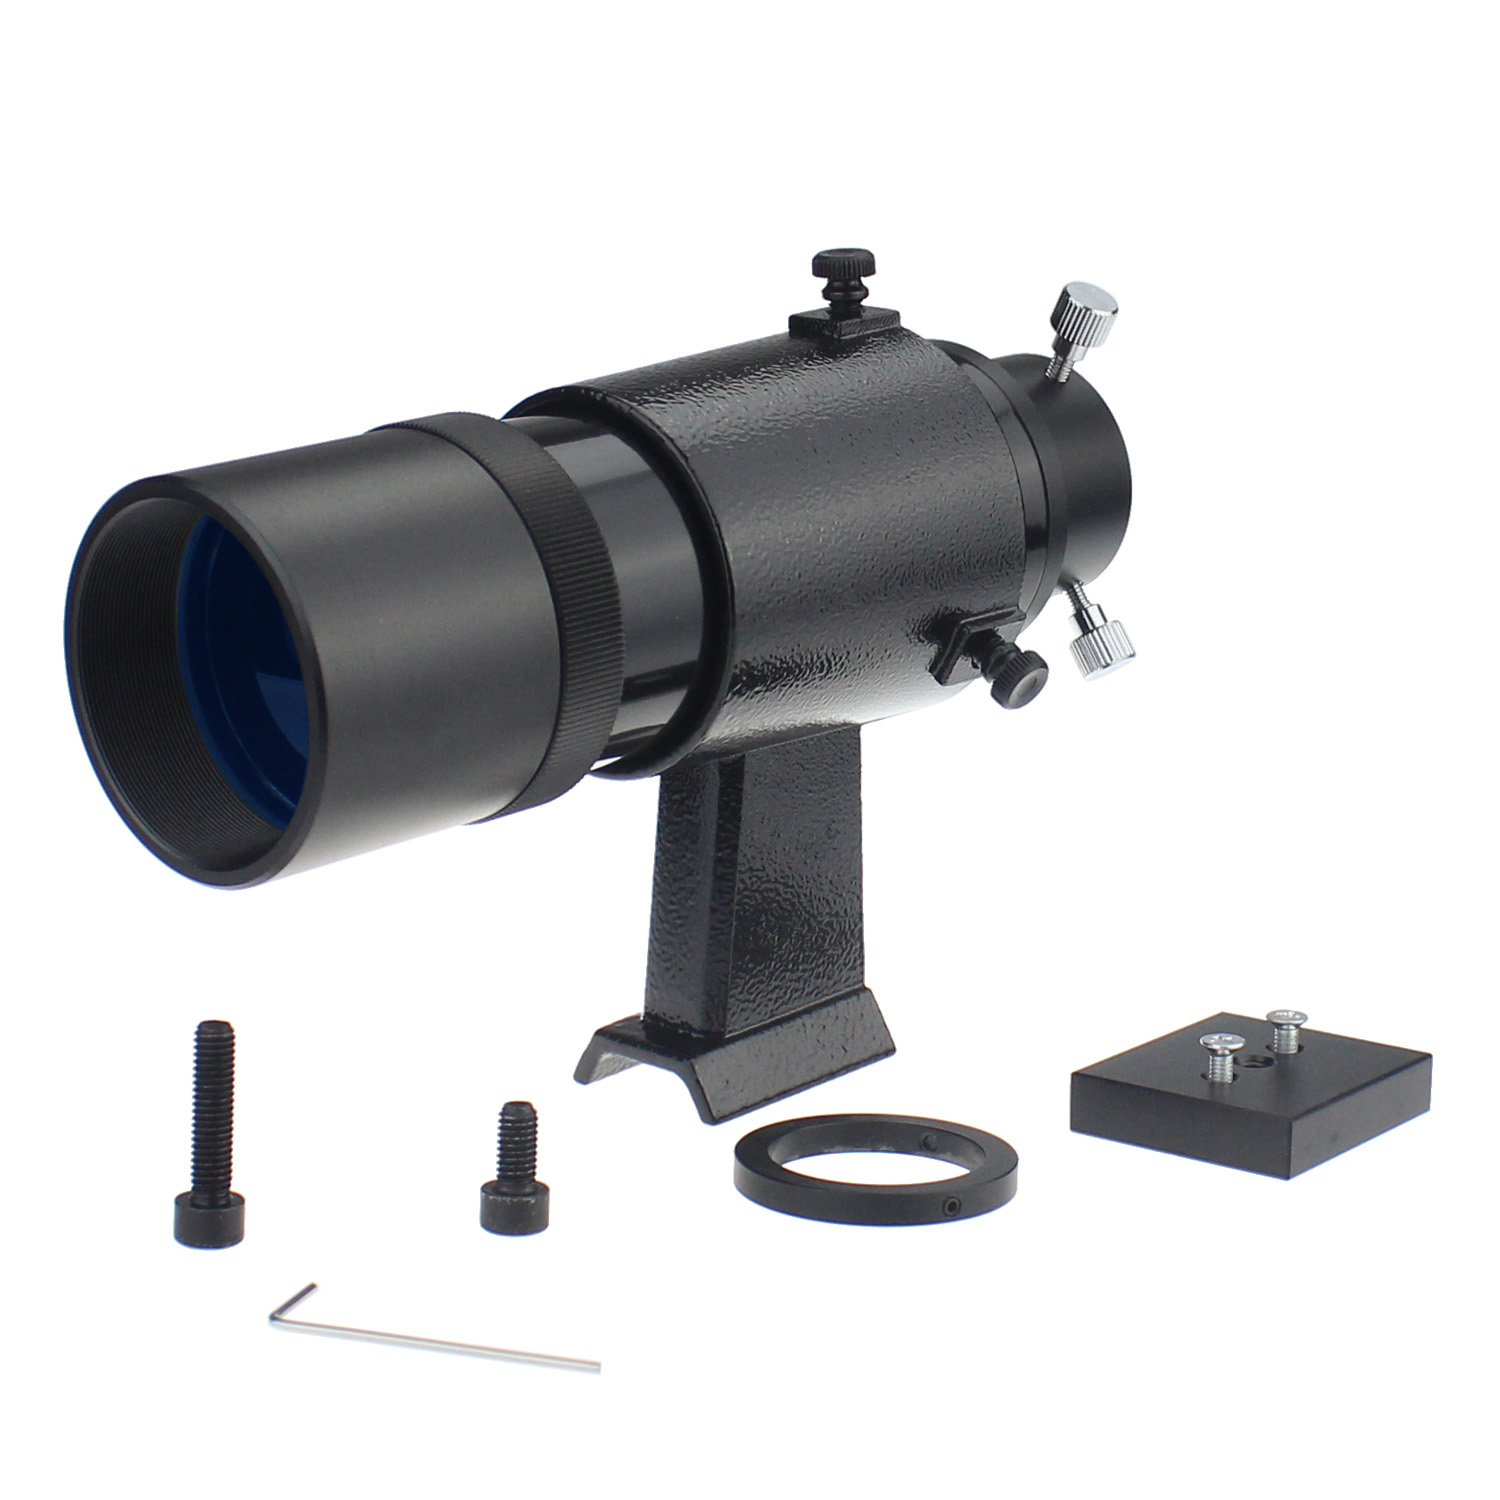
Solomark F50 Guidescope

Right from the start, I liked the smooth, graded helical focuser that makes focusing very easy, a big advantage over models without one. In fact, apart from the helical focusing travel, the focuser has a telescoping drawtube (also graded) which allows you to reach focus easily even with an eyepiece – no need for an extension. Some people claim helical focusers can add flexure, so we’ll have to see about that. The optics look good (real 50mmm unobstructed aperture) and the build is solid, even the front cap is metal (no focuser cap though, strangely), except the nylon screws – although it seems quite sturdy I have heard some cases where nylon screws added flexure, so that’s an additional concern. The total weight of base & optical assembly is 590g.
Now there is a small issue with the dovetail. While you’d expect it to be the same size as the usual finderscope base, it is, in fact, a few mm thinner. This has the effect that some bases with relatively short screws (e.g. the standard finder shoe on the SkyWatcher Evostar 80ED) can’t reach it to secure it. A longer screw fixes the problem (and some shoes, like the one on my SkyWatcher 130PDS, don’t have an issue to begin with).
The specs claim “190mm f/3.4” (which does not exactly compute with a 50mm aperture), and plate-solving with a QHY5L-IIm camera gave me  a close enough value of 182mm focal length, which makes it a very fast f3.64. There is also an “F60” model, which is the 60mm version.
Where to buy: You can get the F50 on Amazon.com or Amazon.co.uk. You can get cheaper unbranded versions from China on Ebay, although I can’t vouch for any specific seller. You might be tempted to also look at the larger F60 at Amazon.com or Amazon.co.uk, although I haven’t tried it myself.

(more →)

Barlow shootout: Skywatcher, Celestron, High Point, TeleVue Powermate and more

December 2, 2016 // by ecuador

I have several barlows in my possession, some came part of larger purchases (a Celestron 2x and a Skywatcher 2x), some where bought when I wanted more than 2x at good quality (High Point Scientific 2.5x, TeleVue 3x, TeleVue Powermate 5x) and some because I was just curious what you could get for cheap (no-name 3x ED, 5x Datyson). Having tried them all, I ended up only using 2-3 of them and I guess it would be good to share my experience with others especially so that they can see what an inexpensive barlow can get them, especially compared to the standard all barlows are usually compared to: the TeleVues Barlow or Powermate.

From left to right: TeleVue 3x, 3x ED, Datyson 5x (top), SkyWatcher 2x (bottom), High Point 2.5x, Celestron 2x (top), TeleVue Powermate 5x (bottom)

(more →)

Processing a (noisy) DSLR image stack with StarTools

November 20, 2016 // by ecuador

Using a DSLR camera for astrophotography has you dealing with quite noisy data, and the issue is compounded if you are shooting from the city under light-polluted skies. Noisy data gives you a hard time when processing, so it would initially take me quite some time and effort to get to pleasing results, even with dedicated software.

StarTools has made my life much easier as it does many things that require many manual steps in other software almost automatically, allowing me to get decent results from an image in just 10-15 minutes. You can always tweak some more of course, but the example process I am going to demonstrate on this post will get you to the following result in just a few minutes:

heart-nebula-equinox

(more →)

Amazon best seller binoculars, “30×60”, “ruby lens” and more…

October 14, 2016 // by ecuador

Update: The “SkyGenius” binoculars listed below were renamed to “BRIGENIUS” and Amazon has banned me from reviewing them, even though my review was a 3-star one full with details and pictures. They are fine with just good reviews from clueless people to be shown, makes for better sales I guess…


Until recently Amazon allowed sellers to give (for free or a deep discount) an item to a customer in exchange for a review. “Review clubs” where formed where this would work systematically, with sellers viewing the profiles of reviewers to select where to send their items. As you can imagine, this led to “reviewers” happily giving 4-5 star reviews to anything that didn’t right-out collapse in their hands, in order to score free stuff. I had noticed that the previously very useful Amazon ratings were getting sort of funky and unreliable the last couple of years, and the worst cases happened in the more sophisticated products, where the average review club serial reviewer would anyway be unqualified to pass judgment. At one point I noticed that Amazon was full of “30×60” binoculars, which, magically (for a set that claims 60mm objective lenses in the title), could fit in the palm of your hand! In some listings they even claimed night-vision! With these charactersitics and their stellar reviews they are the second most popular binoculars on Amazon.co.uk (fortunately they are a little less popular on Amazon.com).  So I ordered a set. Then, I signed up in a review club myself, and got a discount on one of the most popular 10×50 sets and also I borrowed from a friend another cheaper, popular 10×50 set and reviewed them all. The spoiler is: don’t buy no-name binoculars based on dubious reviews, and especially avoid anything “ruby lens”, “red membrane” etc. I’ve left reviews on Amazon and some are prominent enough to spare some people from garbage purchases, although others get rather inexplicably voted down and disappear from the first page (I’ve been contacted by people who get stuff from seller for free to tell me the sellers ask them to down-vote me). My “Hobby Store” review actually pissed off the seller and there were some exchanges and wild accusations (they sort of apologized in the end)… Anyway, here’s what I gathered to put to the test:

L to R: SkyGenius 10x50, Mini "30*60", Hobby Store 10x50

Left to right: SkyGenius 10×50, Mini “30*60”, Hobby Store “Good Quality” 10×50

(more →)

Baader Astrosolar Photo film ND 3.8

September 23, 2016 // by ecuador

In a previous Solar filter test I explored how various filters help with getting some better white-light Solar surface feature photos, and I had noted that while I was using the Baader Astrosolar Safety ND=5.0 film, some narrowband filters would benefit from the photo grade Astrosolar ND=3.8 film, as with allowing as much as 1/6310 of the Sun’s light (vs the 1/100000 of the ND=5.0) gives you much smaller exposures that have less noise. It turns out that the photo film by itself gives you an improvement in results that no combination of filter can give you when using the ND=5.0 film, and allows you to use really long focal lengths. Because it speaks louder than words, just take a look at my first attempt at the Sun with the photo film and just my 80mm ED and Canon 600D in 3x zoom video (stacked with Autostakkert):

Skywatcher 80ED, TeleVue Powermate 5x, Baader Astrosolar ND 3.8, Canon 600D mod @ 3x zoom video

Great detail, right? It is at an effective 4000mm focal length using a 5x TeleVue Powermate and yet thanks to the high transmission of the filter I could do a 1/1250s exposure at ISO 400. Apart from stacking with Autostakkert I used Registax 6 for wavelet sharpening and made the color yellow in post-processing (normally the Baader filter gives you pink/purple with a modded DSLR). The filter is usually sold in 20x30mm and 50x100mm sheets (at £30-60 usually in the UK, similar in the rest of the world) but, strangely, there seems to be a shortage right now, so your best is to look at ebay – that’s where I got mine.

(more →)

Baader Astrosolar vs Thousand Oaks Black Polymer solar filter

September 11, 2016 // by ecuador

There are two popular kinds of inexpensive solar filters which you can buy in unmounted sheets, cut them and mount them yourself. The older kind is the black polymer type, with the most famous kind (especially in the US) being the one that Thousand Oaks makes (their glass filters are also popular), while the currently more popular (at least in Europe) type is Baader’s Astrosolar safety film. I have used the Baader film for a few years, but thought I’d give the Thousand Oaks a try in case it gives me something the Baader does not.

You can get the Thousand Oaks filter directly from the US manufacturer, or you can find a bit cheaper sheets on amazon.co.uk, amazon.com or ebay (starting at around $15/£14 for a 6″x6″ sheet). The Baader film can also be found on amazon.co.uk, amazon.com, FLO and ebay with prices starting at around £20/$37 for an A4 sheet. Be careful, we are talking here about the “visual” (ND=5.0) Baader film, as there is also the photo version (ND=3.8) which is only for high-power photo use (or visual with narrowband filters) – for a test with that filter check here.

The Material

SolarFilters

Baader on the left, Thousand Oaks on the right

Both materials are relatively easy to cut with scissors. Don’t worry if the baader film looks crumbled when you mount it, you are not supposed to tighten it, that’s how it should be. The black polymer seems like a tougher material, but as I’ve never had the Baader tear on me with some reasonable handling, I wouldn’t say it is too sensitive. It is always recommended to check your filters for holes before your session in any case – this particular Baader hasn’t developed any in the 3-4 years I’ve been using it.

First impressions

The biggest difference when you see through these two filters is the color of the Sun:

Baader Astrosolar Safety Film

Baader Astrosolar Safety Film ISO100 1/160s

Thousand Oaks Black Polymer

Thousand Oaks Black Polymer ISO800 1/80s

(more →)

2016 Mercury Transit @ Heaton Park

May 13, 2016 // by ecuador

We had an unusually sunny day at Heaton Park on May 9th, so we enjoyed the Mercury Transit along with many friends from the Heaton Park astro group and even more people who where just enjoying their day at the park.

HeatonParkMercury

The only downside was the strong wind, which tended to cover everything with dust and was adding a constant shake to my telescope. However, after stabilizing the video from the start of the Transit is quite pleasant:

2016 Mercury Transit from Heaton Park 720P HD

(more →)

Imaging the sun in white light and Baader Solar Continuum or other color filters

May 7, 2016 // by ecuador

One of the most inexpensive accessories you can get for your telescope is the Baader AstroSolar safety film which you can use to safely observe and photograph the sun. Baader also has the 540nm-pass “Solar Continuum” filter to improve the definition of some solar features, so I thought I’d run a little experiment to see exactly what this filter (which actually costs quite some more than the AstroSolar film) can do for me and also try out some other filters to see whether I can get better results than using the AstroSolar film by itself. Note that the AstroSolar film covering the front aperture of your scope in full is mandatory – a filter alone at the eyepiece side of the telescope is not enough to prevent instant blindness or the destruction of your imaging sensor.

Setup

I used my Skywatcher Evostar 80ED with a full-aperture Baader AstroSolar visual film and a 2x barlow with a full-spectrum Canon 600D. Narrow-band filters like the Solar Continuum would work better with the AstroSolar photo film (allowing shorter exposures), but that seems to be out of stock right now in the UK at least, so if I obtain it in the future I might update the article. In any case, for each filter tested below, I shot a few full frames of the solar disk, of which I stacked 3-4 to reduce noise, and also a short video in 3x Digital Zoom video mode stacking about 250 out of 1000 frames after converting it to grayscale and having the same wavelet sharpening applied to all cases.

UV/IR Filter (Optolong)

Since I was using a full-spectrum modified DSLR, the UV/IR filter is the “no additional filter” equivalent case. So this is what the AstroSolar film can do by itself at the visual part of the spectrum:

Sun_80ED_20160504

UV/IR ISO 200 1/500s

Sun_80EDx2_20160504

UV/IR 30s video stack

(more →)

Review: iOptron ZEQ25 (CEM25)

April 12, 2016 // by ecuador

7100-2

Update: See how the ZEQ25 compares to the CEM25P update in my latest review.

A couple of years ago I got one of the most popular Equatorial mounts for small to medium OTAs, the Skywatcher HEQ5 (known as the Orion Atlas outside Europe). I got along pretty well with it, it was paired mostly with an 8″ Skywatcher 200PDS newtonian which is near the maximum comfortable load. I stored it in a corner of the living room, although I had to loosen the accessory tray, rotate it so that the legs could be contracted to fit it through doors when taking it in or bringing it out of the house. At around 15kg for mount & tripod it was near the limit of what I would personally call portable. Then, last year, as I was considering upgrading my mount to the pro version, I started reading about the iOptron ZEQ25. Apparently, iOptron are relatively well known and popular in the US, but have only recently started becoming known in Europe. They have some “traditional” German equatorial mounts (the iEQ line), but also the “Z” or “center balanced” equatorial mounts ZEQ25 and CEM60. The latter are supposed to have the advantage of an increased load/weight ratio and a permanently unobstructed polar scope. In fact, the “small” ZEQ25 has a maximum load not far from my HEQ5, while being significantly much lighter. And this is the main reason I got it. I thought that a smaller, lighter mount would allow me to take it out more often and if I wanted to do astrophotography it would be well matched with a small apo refractor, making a very portable package.

While I started writing this review soon after I got the iOptron, for some reason it was left unfinished and unpublished. So I am finishing it up now, a year after getting the iOptron, having had more experience with it. In the meantime, iOptron has upgraded the electronics of the mount and renamed it to CEM25 (although, at least in Europe, it is not easy to get the updated mount yet) and also I got a new HEQ5 Pro for my vacation home (since I found an amazing deal on it), so I can do an even better comparison with it. (more →)

Celestron f/6.3 reducer/corrector with DSLR on C9.25

March 31, 2016 // by ecuador

reducerAlthough I got my C9.25 mainly for planets, the fact that my tiny iOptron ZEQ25 mount seems to handle it for longer exposures made me look into using it for DSOs as well. The problem of course is that it is quite slow at f/10, has a very demanding 2350mm focal length and has quite some coma on an APC-S sensor. Supposedly all these problems can be abated with the Celestron f/6.3 reducer/corrector (1480mm focal length, 2.5x less exposure, less coma), which is also relatively inexpensive as far as reducers go. One issue I found before trying the reducer is that there is not much info on using these photographically. Even the included Celestron manual doesn’t mention anything about proper distance from the sensor, how much correction it does (it vaguely says that it improves but does not eliminate) and what about things like vignetting? So I did some experimenting with my Canon DSLR and wrote down my observations for myself and whoever is planning to use one. (more →)

Starguider 2″ Field Flattener (TSFlat2) on SkyWatcher Equinox 80 ED

March 2, 2016 // by ecuador

I’ve already tried this refractor Field Flattener on a SkyWatcher Evostar 80ED in a previous post. To sum it up, it did perform well on the Evostar and the best value was the Starguider 2″ Field Flattener sold by Sky’s the Limit on ebay.co.uk, which is identical to the TSFlat2 from TS (but the TSFlat2 is more expensive and does not include any adapters/extensions). So, without any delay here is my first test with the flattener at 119mm from the Canon 600D sensor:

EquinoxTSFlat2B

(more →)

28/9/2015 Lunar eclipse photos & time-lapse

December 24, 2015 // by ecuador

I finally had time to process my photos from my “Supermoon” lunar eclipse photo session at Salford Observatory. It was a very cold and humid night, 4 people showed up, 3 stayed until at least after the eclipse maximum, but it was the best lunar eclipse I’ve observed (large moon and very nice red color – due to rayleigh scattering of course). It was my first ever session for both my Skywatcher Equinox 80 ED refractor (on the iOptron ZEQ25) and the Canon 600D which was un-modded at the time. The reason I did not make an eclipse post earlier is because I wanted to make a nice time-lapse video, something that takes a little time. It covers the eclipse from the start to the maximum (2h 50m) later and I hope the result is pleasing (try full screen HD):

2015 "Supermoon" "Blood Moon" Lunar eclipse HD time-lapse with Equinox 80 ED

For more pics and the how and why of the session and the timelapse, read on.
(more →)

Planetary imaging comparison: Webcams vs DSLRs vs Planetary Cams

August 27, 2015 // by ecuador

The not so young amateur astronomers like myself who were aware of how difficult and demanding planetary photography was in the “old days” (i.e. 20th century) are pretty amazed at what you can achieve nowadays with equipment as simple as a webcam. Granted, most of the “magic” lies in the software processing that stacks hundreds of mediocre frames in a video to produce a sharp, detailed image of a planet, however the hardware is still important. So, after experimenting with their webcam, people want to try something better. Specialized planetary/guiding cameras are the obvious choice, however people put in good use less expensive solutions, like putting the LiveView-capable DSLR they already have in planetary use, or re-purposing an Industrial/Machine Vision camera. I happen to have gone through all these categories and thought about putting all my imagers to the test to see what you can expect from each.

From left to right: Canon 450D, Xbox Vision, QHY5L-IIm, Point Grey Firefly MV, Logitech Quickcam Pro 3000, Canon 550D

From left to right: Canon 450D, Xbox Vision, QHY5L-IIm, Point Grey Firefly MV, Logitech Quickcam Pro 3000, Canon 550D. A Canon 600D was obtained last minute, so it is missing from this photo.


(more →)