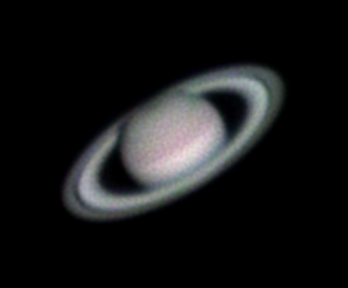
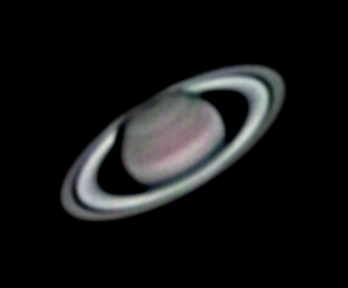
The number one enemy of planetary photography is the atmospheric condition, or “seeing”. Despite modern software being able to select and stack the best frames among thousands, the difference between results with good vs bad seeing can be great. Shooting at high FPS (60 or more) and using shorter exposures with sensitive cameras can help. An even better tool, especially for people who shoot with monochrome cameras, is to get a luminance frame through an IR-pass filter. Here is an example from last night using my C9.25 @ f/25 and a QHY5L-IIm camera, the left photo using for luminance a shot through the usual IR-cut filter, while the right one through an IR-pass (a “generous” one at 630nm), both processed with the same Registax 6 settings:
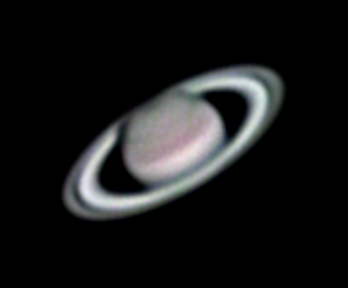
L+RGB light sharpening

IR+RGB light sharpening
And the same images for those who prefer heavier wavelet sharpening (it helps a bit on the rings, but not on the planet surface):
L+RGB heavy sharpening
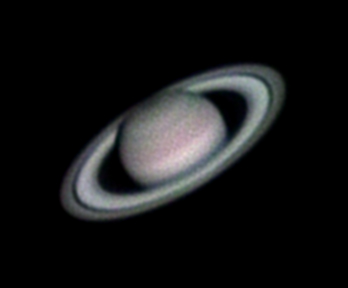
IR+RGB heavy sharpening
Inexpensive IR Filters

48mm IR 630nm filter
In any case, the improvement should be obvious from the above examples and is nothing new to most planetary photographers. My tip, though, is that you don’t really need the relatively expensive Astronomik 742nm or 807nm IR filter (£79 for the 2″ version in the UK). Unlike complex filters, simple IR-pass filters are not that hard to make, hence you get good results with inexpensive filters for photographers. For example, search for 48mm IR filters on ebay and you will find very cheap (less than £20 right now) filters that are essentially the same as 2″ telescope filters. In fact, they come in more varieties than the usual astronomy filters, like the 590nm and 630nm (the one I used above) which limit turbulence a bit less, but can be used with even smaller telescopes and/or less sensitive cameras. In general, the 630nm is my favorite all-around IR filter for both astronomy and daytime photography, and in Saturn’s case it required an exposure (or gain) increase of just 45-50% for the same histogram. For large telescopes, you can go with more restrictive IR filters, like the 742nm, 807nm etc…
IR Filters With Color Cameras
OSC (One Shot Color) cameras can also take advantage of the IR filter benefits. You shoot once with the IR-pass filter and use the photo as your monochrome luminance (L) layer, then without the filter (actually with an IR-cut if your camera does not have one) and use that in place of the of the RGB images to get the color information. The way to do this on Photoshop is to paste the IR-pass image on the bottom layer, convert it to monochrome, then paste the “regular” IR-cut image above it, switch the layer to “difference” blend mode (right click on layer -> blending options) so that you can align it properly with the layer below and then switch it to “color” blend mode. If your color camera has a built-in IR-cut filter that you cannot remove, you can’t take advantage of the 742nm & 807nm filters, however you could try your luck with the 590nm and 630nm filters which allow some of the red visible spectrum as well.
PIPP – Planetary Imaging PreProcessor
I might have mentioned before a little piece of software called the Planetary Imaging PreProcessor (PIPP). I first used it when Registax (I think v.6) had trouble aligning some videos, so I had PIPP center the planet first (choose the “planetary” option, but make sure the default crop of 448×448 px is enough for you). Then, I used it when I started using my 550D’s crop video mode to convert the Canon MOV files to AVI with lossless compression (select “ULRG” Avi File Option under Output Options). But while processing last night’s session I thought about trying out the “experimental noise reduction filter”:
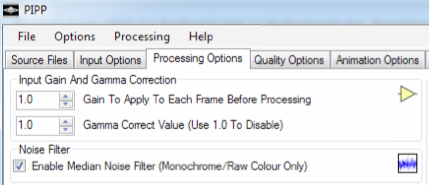
I am pleased to say that it seems to help a bit!
IR+RGB light sharpening – no NR
IR+RGB light sharpening – PIPP NR
On the right, PIPP Noise Reduction is applied before processing with Registax 6 using the same settings. Ok, it is nothing dramatic, you have to look carefully for the differences, but it is not bad for just an extra tick-mark in your workflow. And with different (stronger) wavelet sharpening:
IR+RGB heavy sharpening

IR+RGB PIPP NR heavy sharpening