
The not so young amateur astronomers like myself who were aware of how difficult and demanding planetary photography was in the “old days” (i.e. 20th century) are pretty amazed at what you can achieve nowadays with equipment as simple as a webcam. Granted, most of the “magic” lies in the software processing that stacks hundreds of mediocre frames in a video to produce a sharp, detailed image of a planet, however the hardware is still important. So, after experimenting with their webcam, people want to try something better. Specialized planetary/guiding cameras are the obvious choice, however people put in good use less expensive solutions, like putting the LiveView-capable DSLR they already have in planetary use, or re-purposing an Industrial/Machine Vision camera. I happen to have gone through all these categories and thought about putting all my imagers to the test to see what you can expect from each.
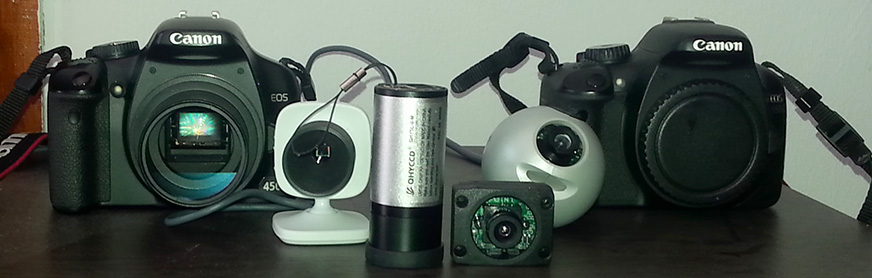
From left to right: Canon 450D, Xbox Vision, QHY5L-IIm, Point Grey Firefly MV, Logitech Quickcam Pro 3000, Canon 550D. A Canon 600D was obtained last minute, so it is missing from this photo.
The Test
I tested 7 cameras (2 webcams, 3 DSLRs, an Industrial/Machine Vision and a Planetary/Guiding cam) over 3 nights with my best planetary OTA, a Celestron 9.25″ XLT Schmidt-Cassegrain. Saturn was chosen as the target as it was higher than Jupiter and Venus during the sessions, and is also less bright which makes a better test for the sensitivities of the cameras (especially when shooting at f/25 with a High Point 2.5x 5-element barlow). Initially I thought one long night would be enough for the comparison, but that first night was very windy, the next had very unsteady atmosphere and so the best images were gotten on the third night. However the experience from the first couple of nights is useful as an indication of what each camera can do on less ideal conditions where for example shorter exposures can make a difference.
A listing of the base specs for each camera:
| Camera Model | Sensor (Type) | QE max | Pixel Size | Resolution | Video Mode |
|---|---|---|---|---|---|
| Logitech Quickcam Pro 3000 | Sony ICX098AK (1/4" CCD) | 38% | 5.6μm | 640×480 | 640×480 @ 30fps |
| Microsoft Xbox Vision * | ? (1/3.6"? CCD?) | ? | 3.2μm? | 1280×960? | 1280×960 @ 7.5fps / 640×480 @ 30fps |
| Canon EOS 450D (modified) | Canon (APS-C CMOS) | 33%** | 5.2μm | 4272×2848 | 848×568 @ 15-20fps (LiveView) |
| Canon EOS 550D | Canon (APS-C CMOS) | 40% | 4.3µm | 5184×3456 | 640×480 @ 60fps (Video Crop Mode) |
| Canon EOS 600D | Canon (APS-C CMOS) | 40% | 4.3µm | 5184×3456 | 1920×1080 @ 29.97fps (3x digital zoom) |
| Point Grey Firefly MV | Micron MT9V022 (1/3" CMOS) | 50% | 6.0μm | 752×480 | 752×480 @ 60fps |
| QHY5L-II mono | Aptina MT9M034 (1/3" CMOS) | 75% | 3.75μm | 1280×960 | 1280×960 @ 30fps / 640×480 @ 106fps |
*I can find no info on the Xbox webcam sensor, except that it is thought to be a CCD. In my tests it seems like its 1280×960 resolution is not interpolated, but the actual sensor resolution, which, given the sensor size I measured (between 1/3″ and 1/4″ sensors) seems to give about 3.2μm pixel size (it would be twice that number if it was a 640×480 sensor).
**The Quantum Efficiency value is for the unmodified Canon.
The software used to capture the video was SharpCap 2.5 and FireCapture 2.4 (more stable than SharpCap and more features, but more complex interface), while the stacking and sharpening was done in Registax 6 with a final pass on Photoshop.
Webcams
 You can actually do some planetary imaging with any relatively modern webcam you might have. In fact, on the left is an image produced by a small $6 Chinese webcam and a relatively inexpensive Celestron 127mm Maksutov. Not too bad for the budget eh? In any case you will get better results using a better camera, preferably with a CCD sensor instead of the much more common CMOS. The Philips SPC900nc and Toucam Pro (and a few early Logitech QuickCam 4000 Pros) with the Sony ICX098QB CCD sensor are considered the best webcams for planetary photography. As my QuickCam 4000 turned out to have the much more noisy Sharp sensor, and the Philips are sold at crazy prices, I did acquire a cheap QuickCam 3000 (similar to the Philips Vesta Pro) which has the Sony ICX098AK sensor – reportedly less sensitive than the “QB” version. I also got an Xbox Vision camera which was sold for next to nothing and also is reported to have a CCD. I can’t find any information on the sensor, but by my own tests it seems that the 1280×960 @ 7.5 fps mode is the actual maximum resolution of the sensor (and not an interpolated/upscaled mode that is common in webcams).
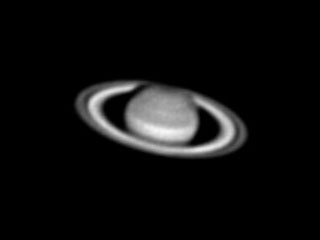
- Logitech QuickCam Pro 3000
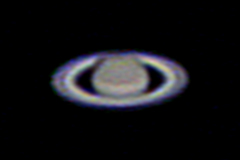
Logitech QuickCam Pro 3000, 640×480 @30 fps, 2.5x Barlow
With maximum gain and 1/30s exposure, the Sony sensor is sensitive enough for Saturn at f/25. Lowering saturation sometimes improves results (you can increase it again in post-processing).
- Microsoft Xbox Vision
Xbox Vision, 640×480 @ 30 fps, 2.5x barlow
Xbox Vision, 1280×960 @ 7.5 fps, 2.5x barlow
The Xbox Vision does not seem better than the Logitech in the 640×480 mode, although it did pick up more reddish rather than bluish color which seems more natural for Saturn. However, as noted above, there is a 1280×960 mode (only through SharpCap) that offers a smaller pixel size than the Logitech’s Sony sensor and could potentially show more detail. The fact that it is only at 7.5 fps limits it quite a bit though – in the above example I was limited to 2 minutes in an attempt to level the playing field, which gives less than 1000 frames, or 4 times less than a 30 fps camera. For Saturn you could continue capturing, but for a target like the quickly-rotating Jupiter the slow frame rate is quite a negative. Some tips for capturing with the Xbox camera: SharpCap will give you the 1280×960 mode option (FireCapture will not), it is sometimes a good idea to lower saturation if you see a lot of noise and prefer YUY2 over the MJPG mode.
- Bad (windy) conditions comparison
QuickCam 3000, 640×480 @ 30 fps, Windy cond.
Xbox Vision, 640×480 @ 30 fps, Windy cond.
Xbox Vision, 1280×960 @ 7.5 fps, Windy cond.
It is interesting to note that in very windy conditions I could get more out of the Xbox webcam compared to the Logitech. While a 2.5x barlow gave worse results so it could not be used, at f/10 the Xbox Vision managed to clearly show the Cassini division at both 640×480 and 1280×960 modes, by ramping up the gain to reduce the exposure length.
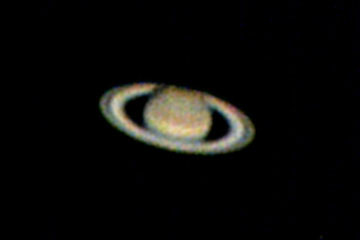
DSLRs
If you already have a relatively modern DSLR, there is no need to try out webcams. DSLRs have (comparatively) huge sensors, of which a planet will only occupy a very small part, perhaps a few hundred pixels across from the several thousand the sensor has in each dimension. In regular video mode, the sensor is severely downscaled (usually to up to HD 1920×1080), so the planet ends up being just a few dozen pixels across in that video image. What is needed, is a video that captures the original pixels of the sensor at 1:1 with not down-scaling, but also crops the image from the full resolution (because a video at 5000×3000 resolution and high frame rate is not really possible due to the bandwidth requirements). With a Canon camera that has LiveView this is easily achieved by connecting the camera to a PC, launching the appropriate software (e.g. the free EOS Camera Movie Record) and capturing the 5x LiveView mode. This gives a 1:1 pixel capture, or something quite close and a frame rate of about 15-30fps (depending the camera). However, there are some Canon cameras that have a built-in video crop mode that will let you get proper planetary video without the need to be tethered, and possibly at greater frame-rates. These are the 550D and 60D/60Da, whose “video crop” mode captures the central 640×480 area of the sensor at a quite nice 60fps. There are also some Cameras like the 600D which have a 3x-10x digital zoom mode. If you use the lower setting (3x) you get a pixel ratio of about 1.11:1 (upscaling 1728×972 to 1920×1080), which seems pretty close to 1:1, right? Let it be our first test.
- Canon Video Crop (550D) vs 3x Digital Zoom (600D)
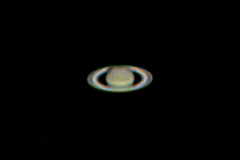
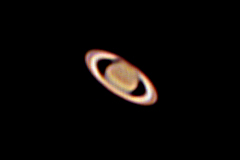
Canon 550D, 640×480 @ 60fps, 2.5x barlow
Canon 600D, 1920×1080 @ 29.97fps, 2.5x barlow
It is pretty clear that the Video Crop mode has a big advantage. The 1:1 pixel ratio has an inherent sharpness advantage for the 550D, which is further incremented by the higher frame rate. The above were shot at default video compression, using MagicLantern you can increase it, which helps a bit, but again it helps more the 550D image than the 600D image.
So, for anything other than the Canon 600D/60D/60Da you should stick with the 5x LiveView method. Even with the 550D, if you use more than twice the video duration with the 5x LiveView method (harder to do for example with Jupiter due to the quick rotation), in order to get about as many frames as you would get with Video Crop, then you can get similar quality, or perhaps even a little better if you did not use MagicLantern to increase the Video Crop mode compression quality. Case in point:
Canon 550D, 1024×680@25fps (5x LV), χ2 duration, 2.5x barlow
- Canon 550D vs modded Canon 450D at bad (windy) conditions
A DSLR is usually modded to increase its deep-red sensitivity in order to capture the Hα line in nebulas. However, a mod and especially the simpler full-spectrum mod are quite useful in planetary imaging as well. For example, a UV-pass filter (e.g. Venus U) can allow a big reflector to capture the clouds of Venus, while an IR-pass filter (usually IR72 or IR85) can avoid a lot of atmospheric turbulence to give a sharper image (that could be used as a luminance channel in combination with a regular color image). A less obvious advantage is that with a UV/IR filter (as you would use for nebula photos) you still get more light towards the red of the spectrum than an un-modded camera, which is equivalent to an increase in overall quantum efficiency.
For example, in normal conditions, the 450D sensor is at a disadvantage compared to the 550D/600D sensor, with a lower quantum efficiency and a larger pixel size (giving a lower resolution image). However, the modded 450D with a UV/IR filter actually requires a shorter exposure than the 550D/600D, an advantage which is easier to show in really bad conditions (windy/shaky) where exposure matters the most. So, during my worst session, I could actually get a bit more detail out of the modded 450D by using a shorter exposure than with the much higher frame rate of the 550D. In such conditions results with the barlow were worse, so the results without a barlow are shown:
Canon 450D mod, 848×568 @ 18fps (5x LV), windy cond.

Canon 550D, 640×480 @ 60fps, windy cond.
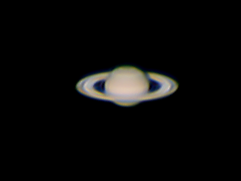
Industrial / Machine Vision Cam
Industrial / Machine Vision cameras are popular among amateur astrophotographers because they use similar sensors to the guiding/planetary cams, but you can sometimes find them at better prices due to larger volume production. Hence, when I found a Point Grey camera for less than £100, I got it and even though it is one of the lowest-end Point Grey cameras you can find (Firefly MV, just 752×480) it did prove to be a step up from webcams and perhaps even DSLRs. It is a mono camera, so if you want color you will need to shoot at least 3 videos with RGB filters. Because I was running out of time, I did not try to get RGB videos, so just for comparison purposes (it is harder to compare mono to color images), I did make a color image using the colors from the Canon 550D.
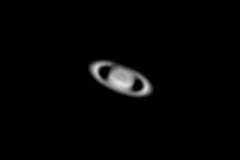
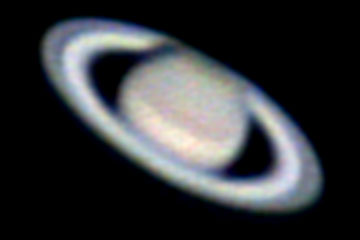
Firefly MV, 752×480@60fps, 2.5x barlow
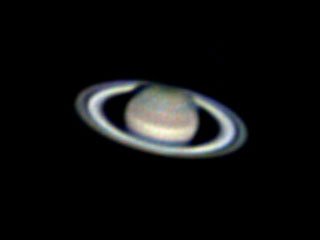
Firefly MV, 752×480@60fps, 2.5x barlow, color from Canon 550D
We can see a “cleaner” Cassini division and detail on planet, with less sharpening noise. A full RGB or LRGB/IR-RGB image with the Firefly MV would be more work, but would yield even better results.
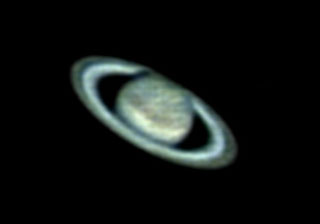
Guiding / Planetary Cam
We would expect a dedicated guiding/planetary camera to provide us with the best results. However, it is interesting to see exactly what a good £200-£300 (or $200-$300) planetary camera can do compared to the either less expensive (webcams) or not optimized for the job (DSLRs) solutions. I am using one of the most popular models, the QHY5L-II. Although we traditionally use CCDs for guiding/planetary cams, this particular Aptina CMOS sensor (also found in the ZWO ASI120mm) with a QE of 75% proved a great performer, hence the popularity. In another post I show how using an IR filter to get the luminance channel can improve sharpness, however to even the comparison (theoretically you could do the same with webcams/modded DSLRs), shots with a regular UV/IR filter plus RGB for color follow:

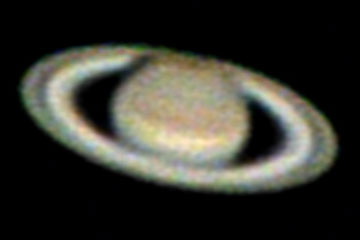
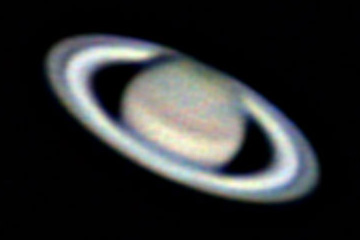
QHY5L-IIm, 1280×960 (ROI 480×480)@75fps, 2.5x barlow
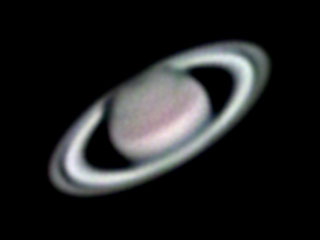
QHY5L-IIm L+RGB, 1280×960 (ROI 480×480)@75fps, 2.5x barlow
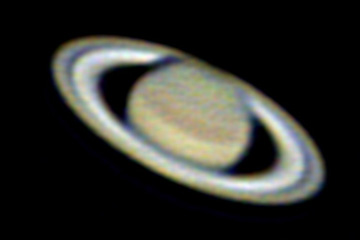
If an improvement over the Point Grey (and perhaps even the DSLR) is not obvious, it is partly because of the little worse seeing while using the QHY and partly my fault as well. You see, this is the only camera sensitive enough to not require either long exposures or maximum gain in order to image Saturn at f/25, so if I had a good quality 4x-5x barlow I could use it with the QHY to get a much higher resolution image. But Saturn season ended before I had time to get one, hence I owe a small update for some time in the future. You can, however, see an improvement even at f/25 if you use a 630nm IR filter on a night similar to the above that did not have great seeing. You see, the DSLR is not sensitive enough to manage f/25 with an IR-pass filter (even the modded one), but it is quite comfortable for the QHY providing a sharper image:
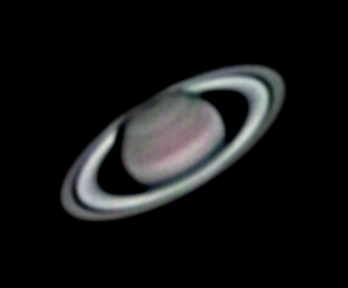
QHY5L-IIm IR+RGB, 1280×960 (ROI 480×480)@75fps, 2.5x barlow
Conclusions
Some conclusions to draw from this comparison: Even a cheap webcam can give you planetary images with some satisfying detail, but if you already have a relatively modern DSLR it has better potential, so no need to bother with webcams (unless perhaps if you happen to have the elusive SPC900nc, but even that is not worth as much as people usually ask for it). Now, if you are looking for a second-hand DSLR to do perhaps some astrophotography but are also interested in planets, it makes sense to go for a Canon 550D/60D/60Da. It is the only one that can do decent planetary imaging without a PC, for all other Canon cameras (even the 600D with the digital zoom), you will need to capture the 5x LiveView with a PC for best results. And even if bringing along a PC is no trouble, the 550D will still give you better results than similar cameras (i.e. other 18MP Canon Sensors or lower/older). Modding the DSLR will also benefit planetary imaging, but go for a full-spectrum mod to have the UV (Venus) and IR (less atmospheric turbulence) options. Planetary or industrial cameras can go a step further and can be sensitive enough to let you image at greater focal lengths (i.e. bigger barlow). Note that while I did not test specifically for this, mono cameras in general can give you sharper results than equivalent one-shot color cameras, but there is much more work involved (shooting through RGB filters and compositing).
What about the camera mods like magic lantern that allows to shoot in raw. would it make a significant or minimal change in the quality?
That is a good question. Back when I had done the comparison, in my tests with magic lantern I could only get a few seconds of crop RAW at resolutions I considered usable, so I did not try to include it in the comparison. I don’t know if it was a slow SD card or something else, but other people have been more successful. Since your frame rate would be limited (even with the fastest SD cards, the controller has a write speed limit), I would expect RAW to make a small difference in quality.