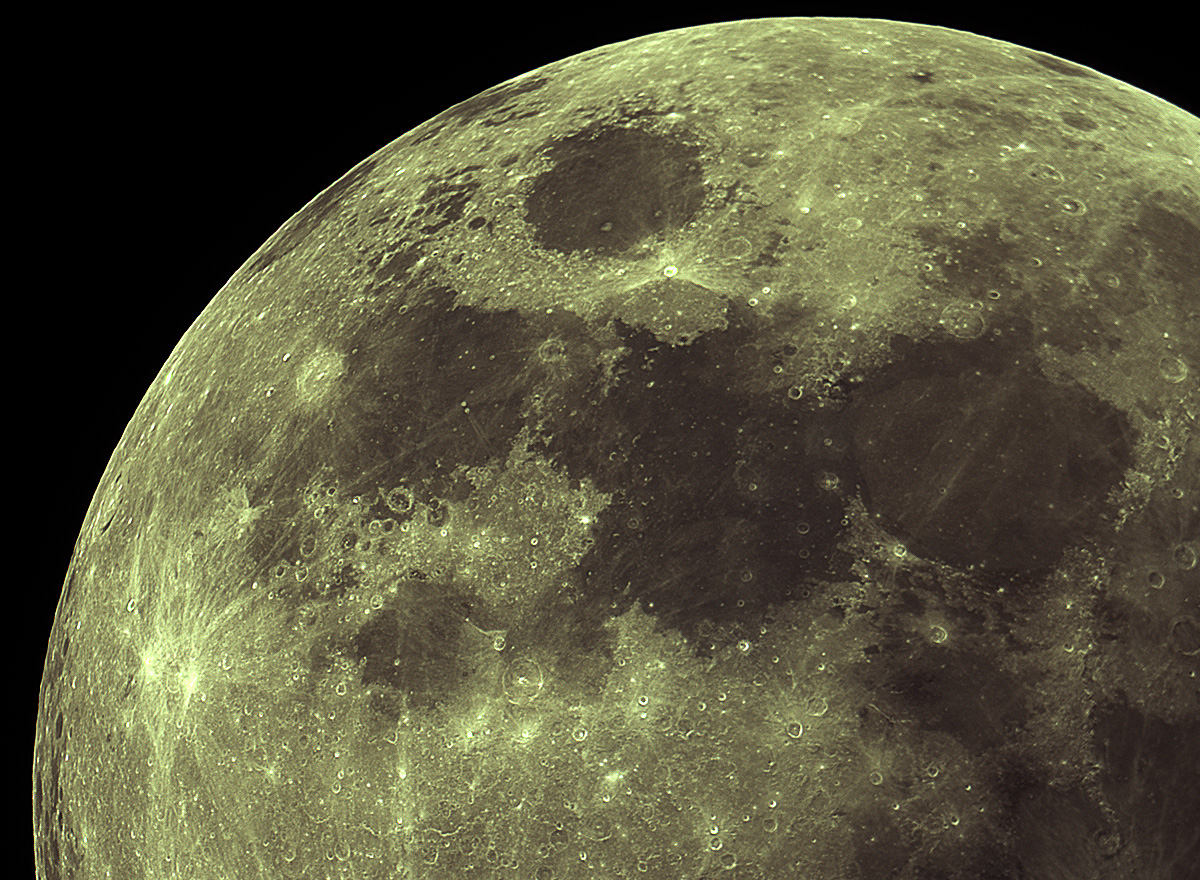
I had my first imaging session with my new Altair GPCAM2 IMX224 last Friday – until then I had only used it for guiding. Since I was going for the moon with a small sensor, I would have to do a mosaic, even with the relatively wide field Skywatcher 130PDS. But I thought I’d go even further, getting a set with the camera’s standard UV/IR filter, a set with a 630nm IR-pass and a set with a Venus U. Combining them R=IR, G=L, B=UV gave this interesting lunar rendering:
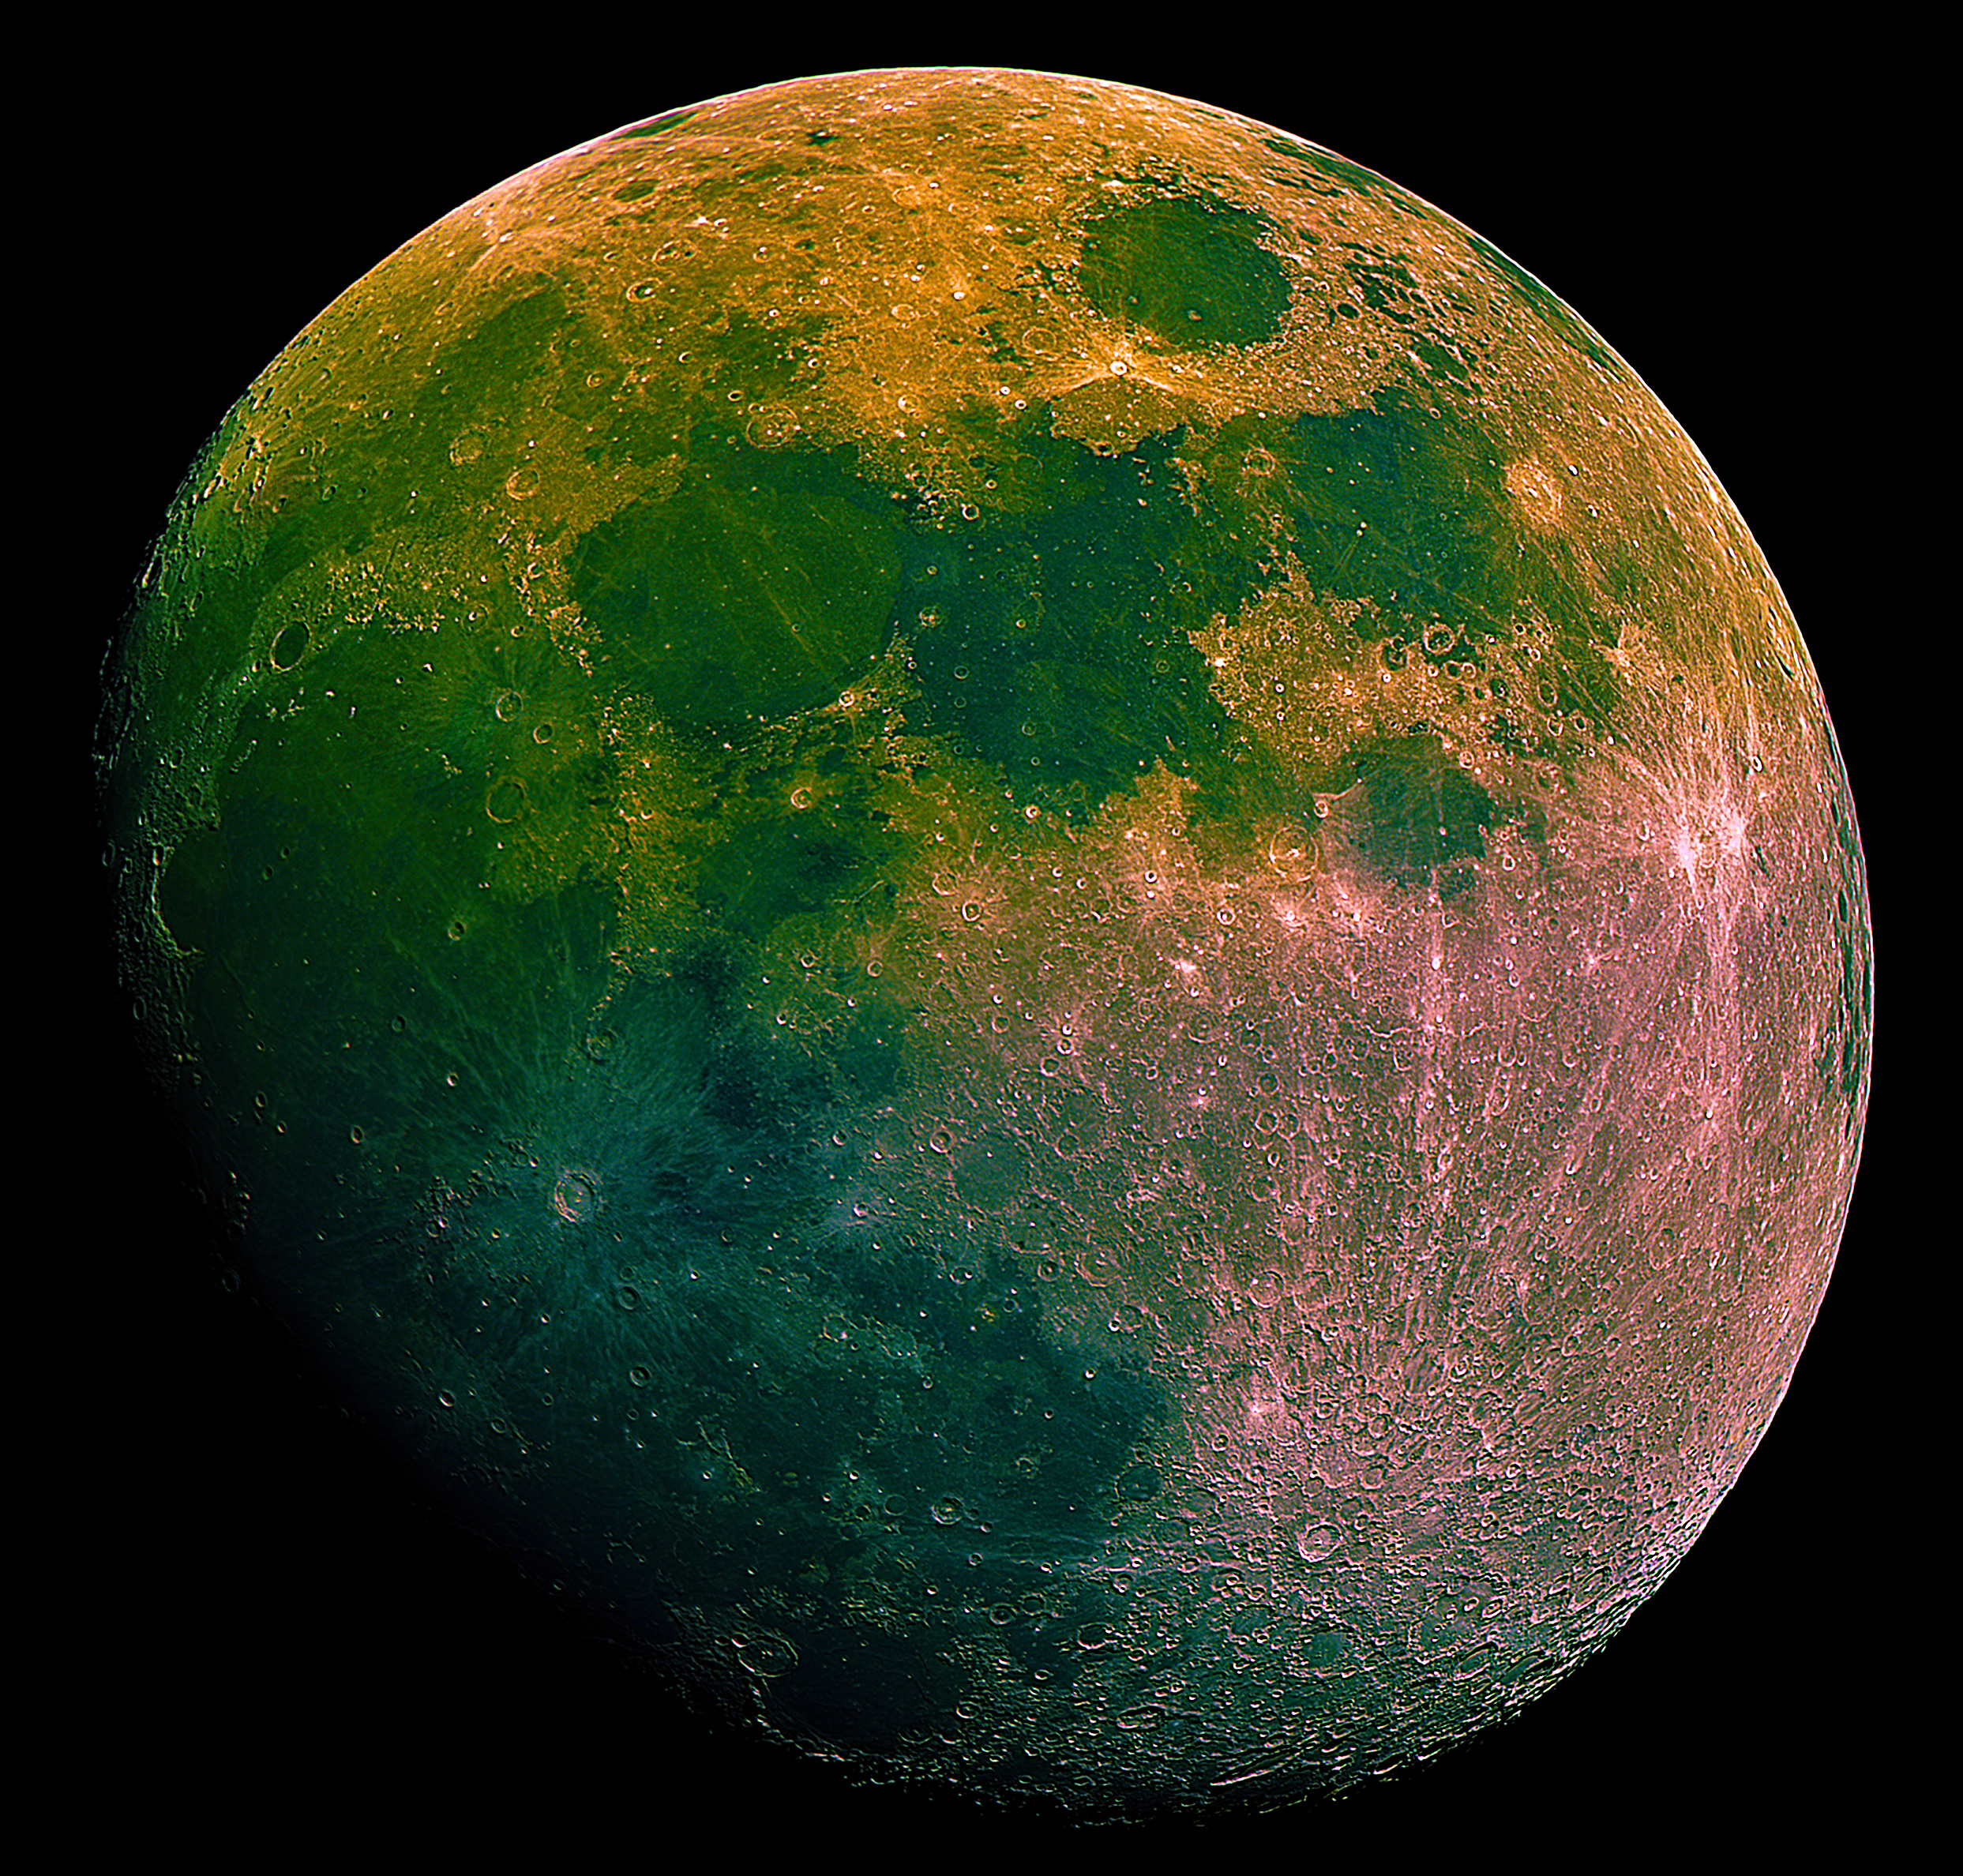
It is not a “true” UV/L/IR, in the sense that the GPCAM2 has a color sensor, so even with its UV/IR filter removed it can only record the very near-UV spectrum (realistically only down to around 380nm or so), so for a bit more of UV you need both a newtonian reflector with no barlows/reducers etc, and an unfiltered mono sensor that is a bit UV-sensitive (a Sony/Kodak usually is, an Aptina is not).
It is worth giving a quick description of the two main techniques involved in producing images like the above: Lunar mosaics, and RGB/Channel compositing.
Mosaics: Acquiring & Processing Images
The idea behind doing a Lunar mosaic is that you get to use a small planetary camera and apply the same stacking & processing techniques you would follow when imaging a planet, in order to get very sharp and highly-detailed images of the Lunar surface, something you can’t really do with regular DSLR full-moon shots. Theoretically you could take something like 1000 frames with your DSLR, stack them, and get a similar result but you would run into a couple of issues: planetary stacking programs like Autostakkert and Registax don’t play well with DSLR images, and 1000 clicks is about 1/100th of the life of your DSLR shutter.
So, while you apply similar techniques to your planetary imaging, here is an overview with emphasis on the things you have to be careful with:
- Take a video (SER or AVI) of each part of the surface moon, making sure that you have a significant (say, 20% or so) overlap between adjacent frames (you will need that when merging) and also that you keep the exact same settings (exposure, gain) for all partial videos. In order to do the latter, decide on the best exposure/gain at the start by aiming at the brightest parts of the moon to make sure you are not clipping them in the histogram. I went with 1000 frames/shot in my case, but you can vary that depending on your setup, the conditions etc.
- Stack each video. I recommend using Autostakkert! 2, which is quite easy to use and usually gives me better results than programs like Registax. It is best to start with a SER video (you can convert your video to SER with PIPP), which you open, select a couple of simple settings and hit “Analyze”:
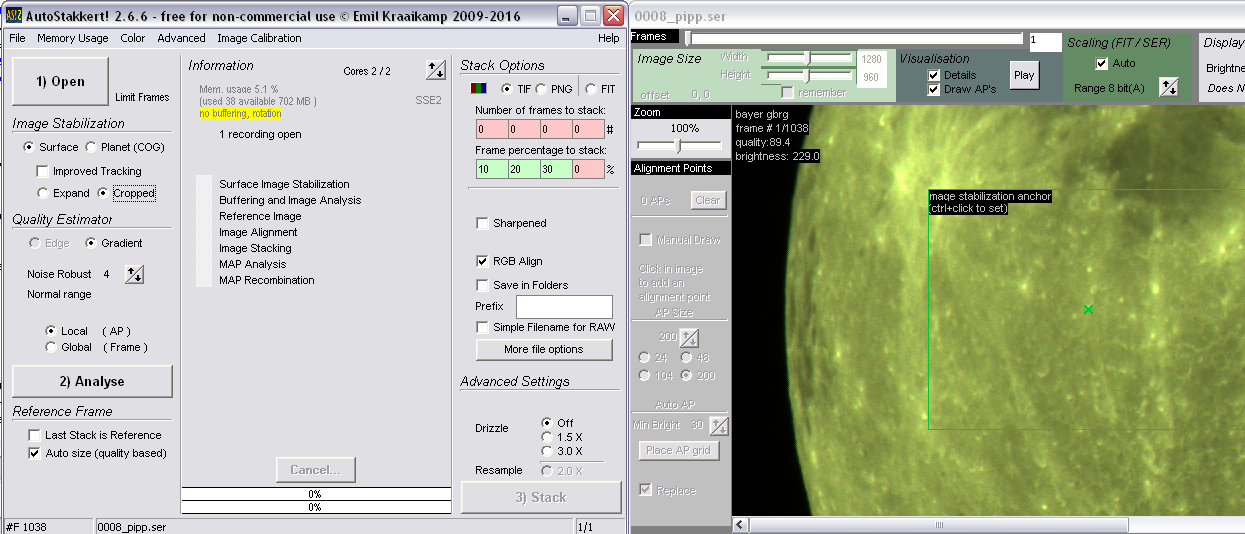
The Image stabilization anchor on the right is normally aimed at some clear detail, but for the moon this means anywhere really… After analysis is done, you add anchor points to the image. “Place AP grid” will do that automatically, which is fine for the moon. You just adjust the size of the points so that you get about 50-150 of them (larger APs means fewer and vice-versa):
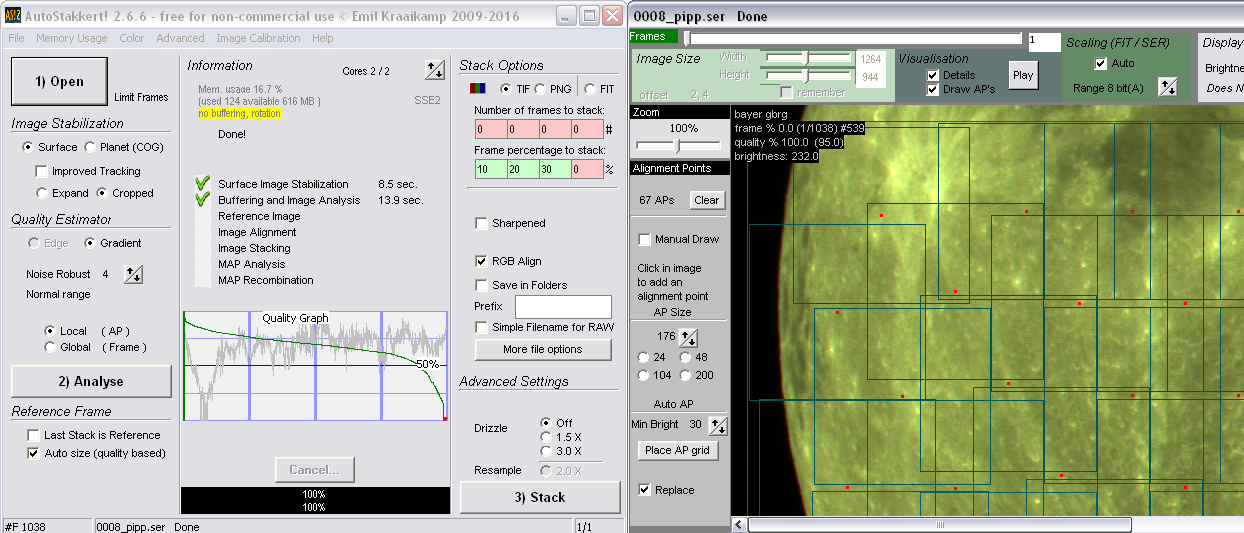
So you hit Stack and in the above example you will get 3 images, one using the best 10% of the frames, the second 20%, the third 30%. In this session I used 10-20% depending on the image, using fewer can increase sharpness but also noise.
- Lastly, I open the resulting TIF image in Registax 6. While I don’t stack with Registax, its wavelet sharpening routine is great for bringing out detail. The process requires a bit of experimenting, and it relies on your subjective preference, but the important thing is to save the wavelet settings as a preset and apply the same preset to all images of a mosaic. You don’t have to use Registax, but if you prefer to use another post-processing method make sure it is exactly repeatable on every frame of a mosaic, otherwise leave it until after merging. In any case, for my session I came up with something like this at this stage:
Mosaics: Merging
- For merging the partial images into a mosaic there are many programs, you can even do it manually in photoshop, but most people tend to use iMerge. It is quite simple, you open your images in a large canvas drag two of them so that their overlapping parts roughly match and right click on a detail (which is almost anywhere on the crater-filled moon). You can choose to go either with color (FITS won’t work for that), or monochrome (I go monochrome at this point with the moon). It is a good idea to enable “feathering” so that the edges of the images blend better together. The only real drawback of the software is that it only accepts FITS, BMP and AVI and I always end up with a TIFF instead from the previous step, so a conversion (e.g. Photoshop for BMP, PixInsight for FITS etc) is required in my case.
At this point you can do any post-processing you like that was not possible before composing the full image (due to not being exactly repeatable), so with a little photoshop I have this for the visual spectrum image:

RGB Composition
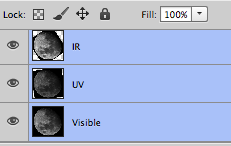
After completing the above steps for 3 sets of the initial videos, each through a different filter, I end up with 3 Lunar mosaics, which I want to combine into a single image. This involves aligning them and assigning them to the R,G,B channels of an image. I do this step in photoshop:
- Put all 3 images into the same photoshop image as separate layers. Optionally, you can double the resolution of the image at this point, to get some more precise alignment out of photoshop. Select all three in the layers panel…
- … and go to Edit->Auto-Align layers. Photoshop will rotate and move the top two to match the bottom one. Make sure it did a good job. If you had doubled the resolution, you can resize to the original size at this point if you prefer.
- Create a new layer. Enable the Channels panel (menu Window). Go to the UV layer, press ctrl+A to select all of the image (or Select->All), go to the blank layer, click on its Blue channel in the channel panel and press ctrl+V to paste (or Edit->Paste). Repeat with copying from the Visible layer and pasting to the Green channel and copying from the IR layer to paste to the Red channel. This technique is the same for any other set of 3 filters you want to use, you just decide which channel each corresponds to. I ended up with something like this:
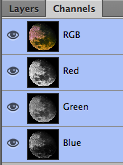
Click on the RGB channel (or the layer) and you can see the final composition. You can apply curves on the separate channels to adjust the blending, and do any other post processing you wish.