
 Although I got my C9.25 mainly for planets, the fact that my tiny iOptron ZEQ25 mount seems to handle it for longer exposures made me look into using it for DSOs as well. The problem of course is that it is quite slow at f/10, has a very demanding 2350mm focal length and has quite some coma on an APC-S sensor. Supposedly all these problems can be abated with the Celestron f/6.3 reducer/corrector (1480mm focal length, 2.5x less exposure, less coma), which is also relatively inexpensive as far as reducers go. One issue I found before trying the reducer is that there is not much info on using these photographically. Even the included Celestron manual doesn’t mention anything about proper distance from the sensor, how much correction it does (it vaguely says that it improves but does not eliminate) and what about things like vignetting? So I did some experimenting with my Canon DSLR and wrote down my observations for myself and whoever is planning to use one.
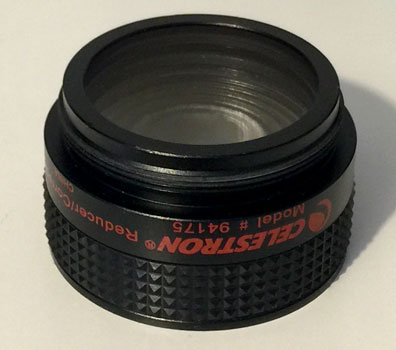
Reducer – Sensor distance

Some people say 110mm is the “right” sensor distance, others say 105mm, so which is it? Also, where do you measure it from (A or B in the pic)? Some people say from the glass, but the glass extends to the end of the male thread (point B), so it goes “inside” your female-threaded adaptor (A-B is about 1cm). Well, there is only one way to find out, let’s measure it and see at what distance it performs as a 0.63x reducer!
So, I tried a few distances and it seems that the often quoted 110mm or 105mm can give you more than 0.63x reduction, even if you count from point A. Let’s see some examples of distances and the reductions. I am always measuring from point A (since it is easily visible when you have coupled the reducer with an adapter) to the sensor of the Canon DSLR. You can measure up to the rim (EOS mount) of the camera and add the flange distance of 44mm (or 43.5mm in my Full Spectrum modified 600D). Be careful, you should also be able to measure just to the T-ring and add the 55mm T-mount flange distance, but for some reason many T-rings are 10mm instead of 11mm, making the distance 54mm to the Canon sensor.
| Distance to sensor (mm) | Reduction factor |
|---|---|
| 106.5 | 0.612x |
| 103 | 0.623x |
| 89.5 | 0.66x |
| 76.5 | 0.69x |
Or, in a chart with a nicely fitting quadratic curve:
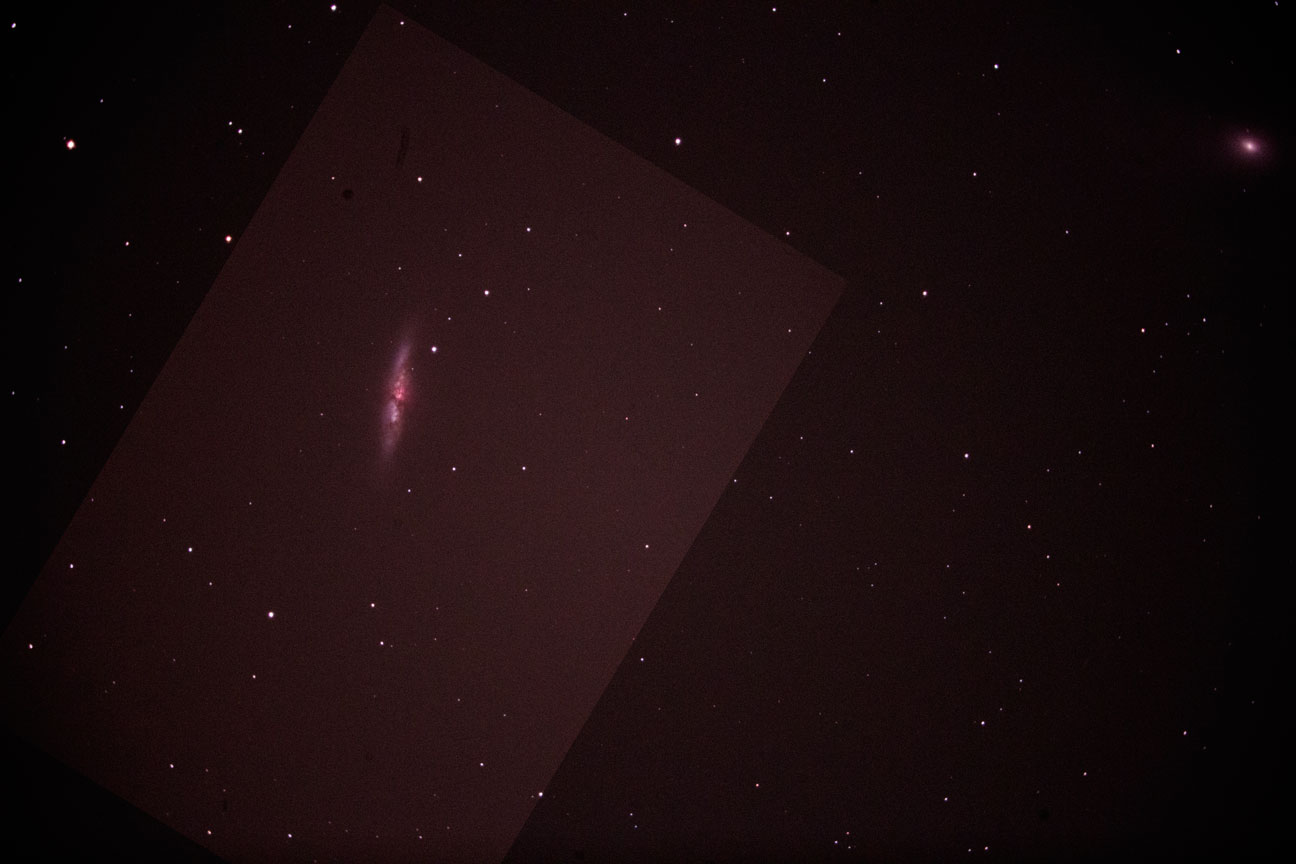
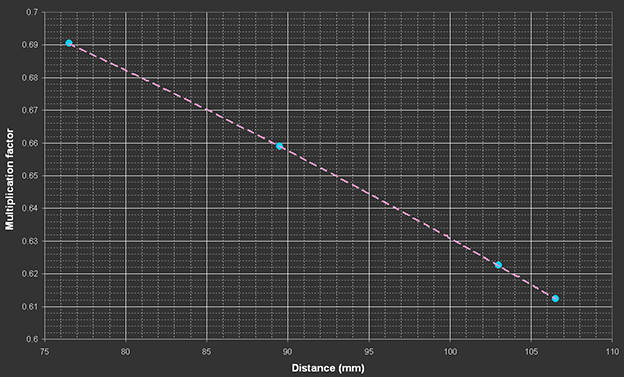 As we can see, the distance that actually gives us the nominal 0.63x reduction is around 100-101mm from the start of the reducer thread to the sensor. So how does the field of view with and without the reducer compare at around this distance? Here is an M82 non-reducer frame superimposed (the highlighted rectangle) on a reducer frame:
Correction
So, how corrected is the image with the reducer near the nominal distance? We shouldn’t expect Edge HD quality flat field from a cheap reducer of course, but is there really an improvement? Let’s look at some corner crops from my test photos with the Canon 600D (APC-S size sensor):
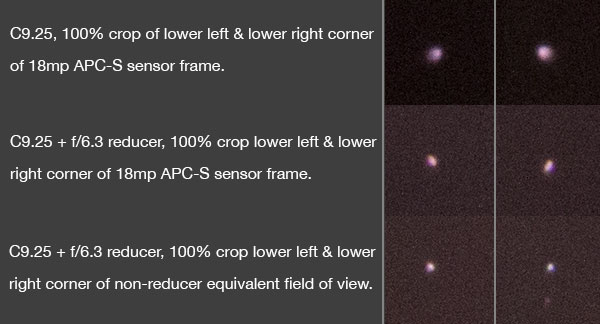 The stars are little comets at the edges of the APS-C sensor without the reducer, which is of course not great as the C9.25 doesn’t give you a wide field anyway, so you are not going to do much cropping. With the f/6.3 reducer there is a marked improvement at the edges. Still not round stars, a bit elongated, but definitely less coma. However, you have to realize that these would not be the stars that would be at the edge of the non-reduced field, the reducer brings a whole extra 60% of field of view, so another interesting comparison is to see how the stars that would be at the edge of your sensor before the reducer turn out after the reducer. From the third set of crops you can see there is almost no coma left at what is no longer the edge of the reduced field. Not bad.
Spacers
So, how do you achieve the exact spacing you need? There are two ways you can go about this. The easiest is to get a short 2″ SCT visual back like the TeleVue ACS-0004, then with a 2″ T-adapter you can adjust the exact spacing (make sure the T-adapter has a thread for 2″ filters as well – e.g. this is a nice inexpensive zero-profile one). Cheaper visual backs can be found on ebay (e.g. this 50mm-long one with compression rings). You can see what I am talking about:
The other method would be to get an SCT to T adapter and then t-mount extensions of the desired length. It is a bit trickier to add 2″ filters with this method, but you can do it using step-up and step-down rings. I couldn’t find 42-48mm step-up/down rings to couple the 2″ (48mm) filter directly to the T (42mm) thead, but I did combine 42-52mm rings with 52-48mm rings:
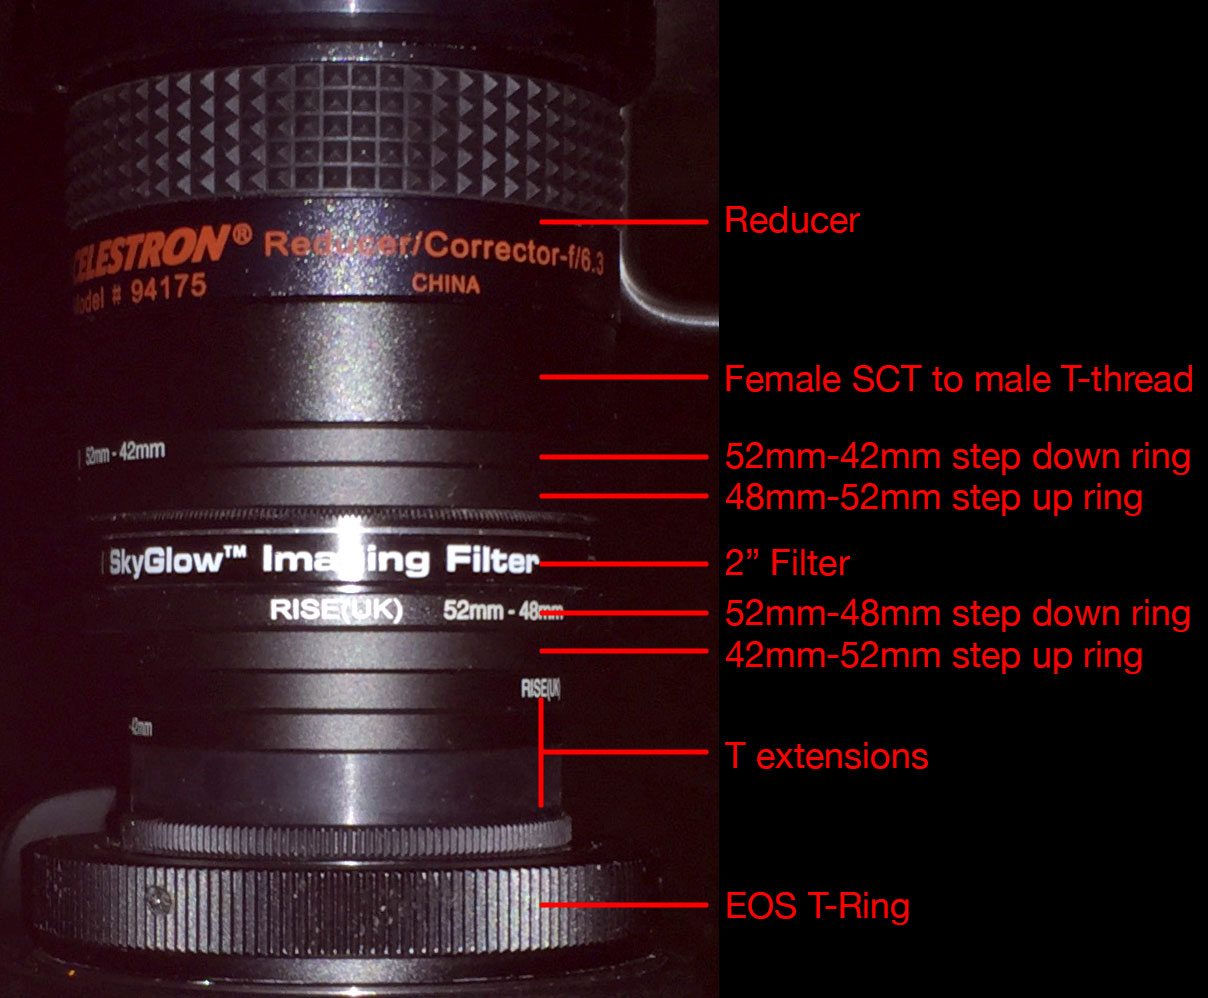
I have tested both methods for vignetting and they produce the same result (see below).
Vignetting
Another important question is how well can a reduced field illuminate the sensor? Well, some light frames could “enlighten” us:
 Well, while we have an average darkening from center to the edge of 8% without the reducer, adding the reducer increases that to about 40%. It is a significant increase, but something like that was expected. In fact, for a reduction as much as 0.63x I would not say it is bad.
Meade
There is also a Meade version of the f/6.3 reducer. They are supposed to be exactly the same, however for at least a while somewhere between 2005-2010 Meade was selling a reducer with a shorter focal distance, which should be fine for visual and with a CCD camera, but it might give you some trouble with the spacing if you use a DSLR camera. So for second-hand made in China Meade reducers (the older made in Japan never had the issue) have that in mind.
Overall
I am pretty pleased with the reducer, it doesn’t eliminate all the SCT disadvantages making it into a fast/flat astrograph, but it does help in all areas that need help. Given its very reasonable price, I’d say it is one of the best investments for your SCT.
Thanks for the nice review. I have recently bought a meade made in japan f6.3 reducer corrector for my Orion 150mm f12 mak, it’s not a direct fit on the mak visual back so i bought mak to sct adapter and a sct visual back and it works nice on mak, making it f7.5 from f12 and i really love the wider view and image brightness. Upto 25mm ep it works perfect without any CO intrusion and very little vignetting in corners almost negligible…thanks once again and clear sky
Glad you like it. FYI you can achieve your scope’s max FOV (assuming it has the same 30mm baffle as the Skywatcher models) even without a reducer, by using a 25mm 70° eyepiece (such as the one from Explore Scientific, or you can also go to the 26mm 70° Panaview or the 26mm 70° SWA).
Thanks for this beautiful review. I am also using this reducer Meade f6.3 japanese on my Orion 150mm mak and it works great, now i am buying edge8 hd scope and I have no idea how this reducer will work on edge. The specific 0.7x for edge is expensive one and i am leaving that for the moment but probably have to buy later.
Another thing i wanted to say is that some people complain about these f6.3 reducers which doesn’t work on their sct and after a lot of reading i came to know that there was some faulty lot of Made in China reducers which were very bad, giving a lot of abberations, fuzzy images and focusing problems so my advice to all the folks is if u want to avoid risk then always buy Made in Japan f6.3 reducers.
Thanks for the comment Sanjeev. The EdgeHD already has a beautiful flat field, and the f/6.3 reducer will introduce curvature to it, it will not be a good idea to use it. The whole point of the EdgeHD is that flat field, otherwise there is no point in paying extra over the non-EdgeHD versions.
And there are no longer f/6.3 reducers made in Japan unfortunately. So, you can only find some second hand ones. Otherwise, the Celestron reducers, although made in China, never had such problems as far as I know.
Hi there, thanks for sharing your work and measurements. I’m curious about how you measured the effective reduction given the sensor distance? I’ve used some calculations to come up with the expected reduction, but what a good method of measuring the effective reduction. Can this be done with measuring the field of view?
Hello. It is quite simple really if you can take photos: compare the ratio of the distance between two stars with the reducer and without. Alternatively, you can also take a photo and upload it to http://nova.astrometry.net/upload which will do plate solving and return the actual resolution in arcsec/pixel from which you can calculate the effective focal length if you know your pixel size (focal_length = 206.265 * pixel_size/arcsec_pixel). The difference in these two methods is that the effective focal length without a reducer is not exactly the nominal (think for example how the mirror moves while focusing), so by plate-solving you can get the precise focal length.
Excellent article. I would like to point out that not all Celestron 0.63 reducers are created equal. After purchasing mine
while in Tokyo, I checked the focal length one sunny day holding the reducer in one hand and a flat piece of wood in
the other. After finding the distance that created the smallest circular image on the piece of wood, my wife made the
measurement. This came out to 230mm. Plugging this into the formula D= Fr ( 1- R) = 230mm (1 – 0.63 ) = 85mm
This is 85mm from your ‘A’ point to the camera sensor (Canon Kiss X3/ 500D). For me this created round stars from
centre to edge on my 30 year old Meade Premier 2080. This surprised me, as the employee at the shop in Tokyo said
that this reducer wasn’t very good. Maybe he didn’t measure the focal length himself. Whatever the case, I think it’s
important that people do this measurement and achieve an exact spacing between reducer and sensor.
Thanks for this in depth review of the reducer/corrector. In your experience, does the level of correction (flattening) vary for different back focus distaces or is it only the level of reduction that changes with backfocus distance.
You’re welcome. The correction is affected, but I haven’t really done any comparison testing, it might be mainly that when I get more reduction I see more of the uncorrected field at the edges.
OK, so, the spacing from the reducer to the Canon censor is 105mm?
Yes, the nominal distance from the sensor to this reducer is 105mm.
Thanks a lot, great explanation. So, if I understand correctly, all measurements start from point A, right? So the right distance from point A is 105 mm?
I use the reducer on a C11 XLT, with a Nikon d610 in crop mode.
Thanks, and hello from Venice
Yes, point A is used for all the measurements. Regards.