StarTools has made my life much easier as it does many things that require many manual steps in other software almost automatically, allowing me to get decent results from an image in just 10-15 minutes. You can always tweak some more of course, but the example process I am going to demonstrate on this post will get you to the following result in just a few minutes:

Apart from very powerful and quite easy, StarTools is also inexpensive, at just 60 AUD, it is available on Windows, Mac OS X and Linux and even has a full-featured evaluation version which you can download freely – only saving is disabled (you can still take a screenshot of your result) – but you have all the time to make sure it’s for you as it doesn’t expire.
For StarTools to work its magic it requires “good data” which means properly calibrated and stacked (i.e. “combined) exposures of the object of interest. So, before jumping into a StarTools example workflow, a few tips about getting good data with your DSLR, as well as calibration/stacking with Deep Sky Stacker (DSS – the best free tool for this process).
Calibration Basics
When we talk about “calibration” of an image, we refer to a process that involves the subtraction of noise and optical defects from our images. In essence, we need 4 kinds of images for a full set that can be pre-processed with DSS:
- Light Frames: The actual images of your subject. Taking several, all at the same ISO and exposure time will reduce noise and bring out more detail after they are stacked together by a program like Deep Sky Stacker. There is no limit to how many you can take (more = better due to less noise). For relatively short exposures, e.g. under a minute, several dozen light frames are usually taken (or hundreds for very short exposures of a few seconds). Light Frames need to be calibrated with:
- Dark Frames: Same ISO, exposure time and (sensor) temperature as Lights, but with cap on. You are basically taking a photo of the thermal noise. Aim for 20+, especially if you don’t “dither” (dithering involves moving the aim of the scope by a few pixels between each frame captured, in order to eliminate pattern noise).
- Flat Frames: Shots taken with a uniform neutral-color light source in front of telescope. For example, with small scopes you can use a tablet screen showing white otherwise a bright LED shining on white t-shirt stretched over the aperture. Many people construct special “light boxes” for this. The important part is that everything, including focus, camera rotation etc has to be at the exact same position as when taking your lights. You are essentially taking a photo of the dust particles etc on your sensor and optics, along with any vignetting (darkening at the edges of the field). You can use an auto exposure (Av mode) to take the first one, since you want to get a photo around 50% gray (don’t worry if there is a color cast e.g. from a filter), but lock on that exposure for the rest of the exposures. This is VERY important. If you sensor is dirty it is more important than dark frames, since StarTools won’t be able to help you much (at least without a lot of work) with an image full of dust motes.
- Bias/Offset Frames: Always same ISO as the rest, set the smallest possible exposure (1/4000s usually), leave your cap on. No need to re-take them for each session, you can use the same ones for months. You are taking a photo of the sensor read noise. This noise exists both in your dark frames and your light frames so you don’t want to subtract it twice. Hence, if you don’t use both darks and flats you wouldn’t need Bias frames.
or: - Dark Flat (Flat Dark) Frames: Darks for the Flat frame exposure time (instead of the Light frame exposure as with “Darks”). DSS can use them instead of or along with Bias frames.
DSLR Tips
- Always shoot RAW. JPG is useless for the calibration and stacking that is required for DSO astrophotography.
- Don’t convert your RAW to TIFF (or anything else) before stacking, at least not with any regular software like Canon’s own or Adobe etc. If you know what you are doing, software like DCRAW can be used to convert to Linear 16-bit TIFF (with the caveat that calibration is more accurate on RAW i.e. before debayering).
- For Canon you don’t have to take the Darks at the same time as Lights, as the sensor temperature is recorded in RAW. The software Dark Master will match your Lights with the appropriate Darks by reading temperatures.
- Astro-modifying your camera will increase sensitivity to the red emission nebulae by about 4 times. Low cost conversions for Canon (and already-converted cameras) are available at Cheap Astrophotography (I am mentioning it since I had 2 mods done there and I am happy with the service).
- Mirror lock-up is always a good idea.
- Never shoot in LiveView mode, it can add an amp glow that is hard to remove – you only really need it to focus, turn it off afterwards. For some cameras (e.g. Canon 1100D) that don’t have mirror lock, you might have to use it (LiveView) though, so in that case use it for Darks as well. Connecting the DSLR to a PC and controlling it (e.g. with APT) is a good idea as it will free you from LiveView and also will allow to do things like dithering while autoguiding.
- Cover your DSLR’s viewfinder (that’s what that rectangular plastic on the strap is there fore) – for Lights and Darks.
- Disable in-camera long exposure noise reduction. We are going to calibrate with darks ourselves.
- ISO: Long story, here for details if you are interested: http://dslr-astrophotography.com/iso-dslr-astrophotography/ . One take-away is that for most Canons use ISO1600 unless ISO800 (or even ISO400) will let you do longer exposures – longer exposures are always better!
- A filter like the CLS is a good idea for the urban light-polluted skies. I wouldn’t worry at all about the color cast from such a filter (your images will basically look purple), as StarTools makes color balancing an easy job.
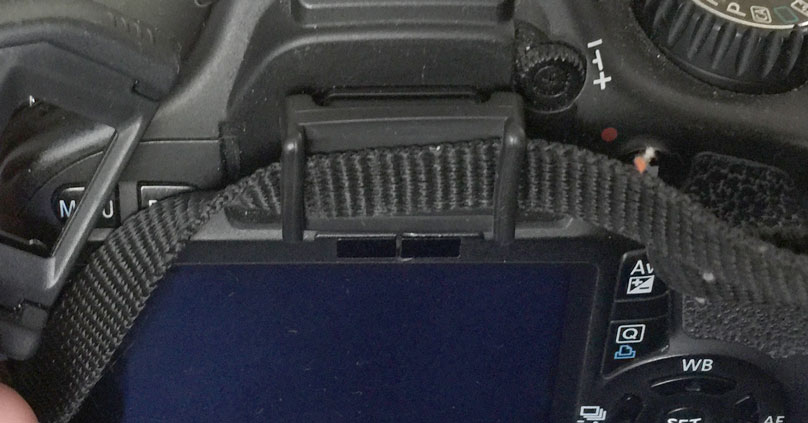
The eyepiece cover of a Canon strap.
Deep Sky Stacker
Although Deep Sky Stacker (DSS) is a bit of a “temperamental” program, I am not aware of a better tool for calibration and stacking available at the moment that is either free or low cost (PixInsight is great, but very expensive), so it gets my recommendation. You can download the free Deep Sky Stacker program from its website. Make sure you update to at least version 3.3.4 since that will support newish cameras in RAW (using RAW DSS calibrates before debayering, which gives the best possible result). There was also a version 3.3.6 briefly released but then pulled back, so I am not sure whether it added more bugs than it fixed (but you can try it from here).
StarTools wants linear and as unmodified data as possible, so you have to be careful about some DSS settings and also to make sure you don’t do anything to the image apart from the calibration/stacking. Some tips are as follows:
- If you get at least 16 Light frames (which is always a good idea)) you can use the kappa-sigma clipping stacking mode (allows frames with planes, satellites etc – more than the “median” method which is second best for that). With darks/flat/bias, using over 16 frames enables kappa-sigma median clipping mode, which is also a good idea.
- For less frames of lights, flats, bias, darks, simple “median” will also always work without problems.
- The recommended “Set black point to 0” in RAW settings may improve the result very slightly (noise-wise), but has caused problems for some people (usually with specific images) – so test if you want to use it.
- The recommended “AHD Debayering” for long exposures, might give you a little more detail, but it often gives more noise than Bilinear debayering, so the latter (Bilinear) is often preferred.
Tips for DSS specifically when using StarTools:
- No “Align RGB Channels” and “No background calibration“.
- In RAW settings, uncheck both Auto White Balance and Camera White Balance.
- Use FITS as the “Final image format” and load the auto-generated autosave.fts on StarTools. If you manually save at the end of the session, DSS will try to apply a histogram curve – it will ask you and you can embed it instead, but the autosave file is your guarantee of untouched data. If the autosave is a TIFF file, it might use compression which StarTools doesn’t support and in that case you’d want to convert it to FITS or uncompressed TIFF using other software.
Example DSS settings, with red marking on whatever is important for StarTools (click to enlarge):


Remember, DSS is a very poor tool for doing any image manipulation after stacking. In fact, don’t even wait for DSS to show you the result of the stack (where it also automatically applies a histogram curve to try and “improve” it), just open the autosave file directly with a proper image processing tool, like StarTools, to avoid ruining your stacked data.
StarTools processing
Hopefully, you will have ended up with a decent stacked image for StarTools to process. First, a little about which version of StarTools you should use. Currently the download page contains a “1.3 stable” and a “1.4 alpha” version. Go for the 1.4 version, it is as stable as 1.3, I’d say only its documentation is not “stable” (as new features are added). In the file you downloaded, which does not need any installation, there are executables for Windows, Linux and Mac in 32 and 64 bit versions. The 64 bit version is faster, but requires twice the memory, so use it if you have a 64 bit system and at least 4GB of memory.
The tutorial will use an image of the Heart Nebula that comprises of 17 x 5 minute exposures taken with a Canon 600D modded DSLR on a Skywatcher Equinox 80 refractor. A TeleVue TRF-2008 reducer was used, as well as a CLS-CCD filter (Optolong brand), which helps a lot with the light pollution, as the Heart Nebula was over the center of Manchester when I took the picture. You can download the stack I will be working on from here.
So, we start StarTools and perform the following steps.
Step 1: Open File
Click “Open” and find your file. You will get a dialogue like this:
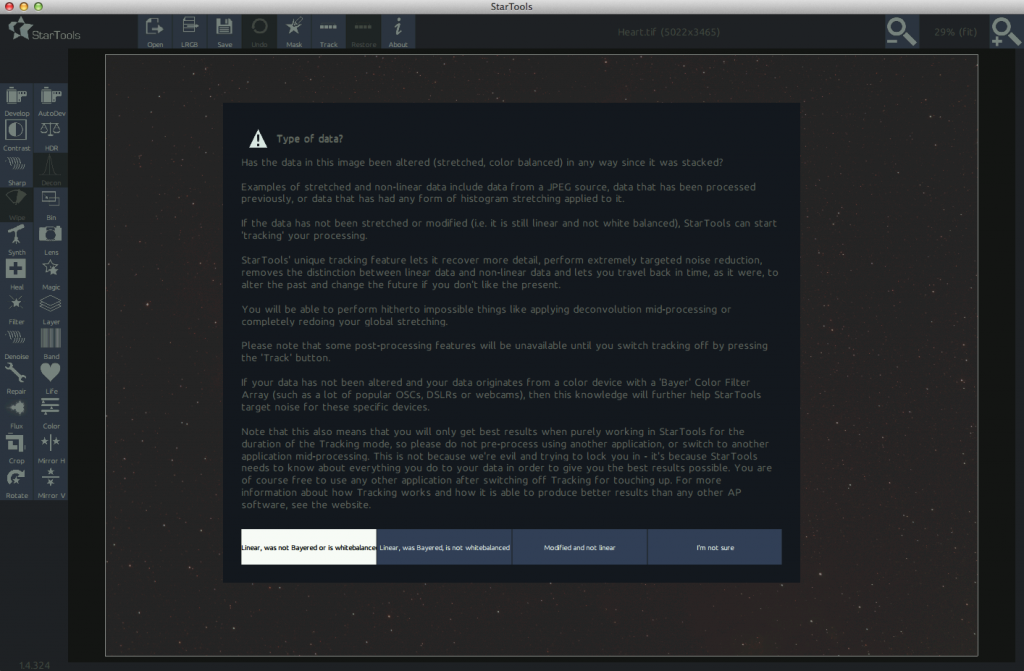
Your image is indeed Bayered (DSS reconstructs full color pixels from your Bayer matrix), but, despite our precautions with DSS it is also white-balanced (the only way to go around this is with an extra process that involves DCRAW, which is a bit more trouble than it is worth), so you choose the first option. Unless you are very curious, no need to dwell more on this, if you used DSS the way described above, it is always the first option.
You may also be notified that your image might contain stacking artifacts at the edges. These will have to be cropped-out later on.
Finally, if you are limited in RAM, StarTools will warn you that you have to bin your image to a smaller size in order to process it – see Step 2 for that.
Optional Step: Lens Module
If the stars around the edges of your image are not points but look more like comets or ellipses, it means you need a field flattener or corrector. StarTools has the Lens module which can somewhat remedy such a problem, but it is not much of a solution (it distorts the center of the field in order to fix the edges), you really need a flattener/corrector if you want to be pinpoints to the edge of the field. If you are low on RAM, you could also do the Lens after the next step (Bin).
Step 2: Bin
In CCD astrophotography “binning” is when you group adjacent pixels (e.g. 2×2) and treat them as one, in order to get more photons (i.e. signal) per pixel. StarTools’ “Bin” module does something similar, reducing the resolution of your image to get more signal per pixel, thus less noise. A DSLR is almost always oversampled anyway, that is if you zoom in you will notice that all actual detail is larger than 1 pixel, so by binning, say 50% (or even more depending the image), you never lose any detail, just noise.
If you are limited in RAM, you may have to bin to avoid running out of memory (a full 18MP DSLR image would require in the area of 8GB RAM). Also, a smaller size will make processing faster – some StarTools modules take a lot of processing power. Consider also that if you are only ever going to see your image on a 1920×1080 monitor, you might not need a higher resolution than that.
The only situations where you might not bin at all are if you are not using a DSLR but a CCD/CMOS that either has large pixels and/or is mono – which is usually not that high resolution anyway, or if your deep space objects is tiny in your frame, in which case you’d use Crop to reduce the image size to not make your object even tinier.
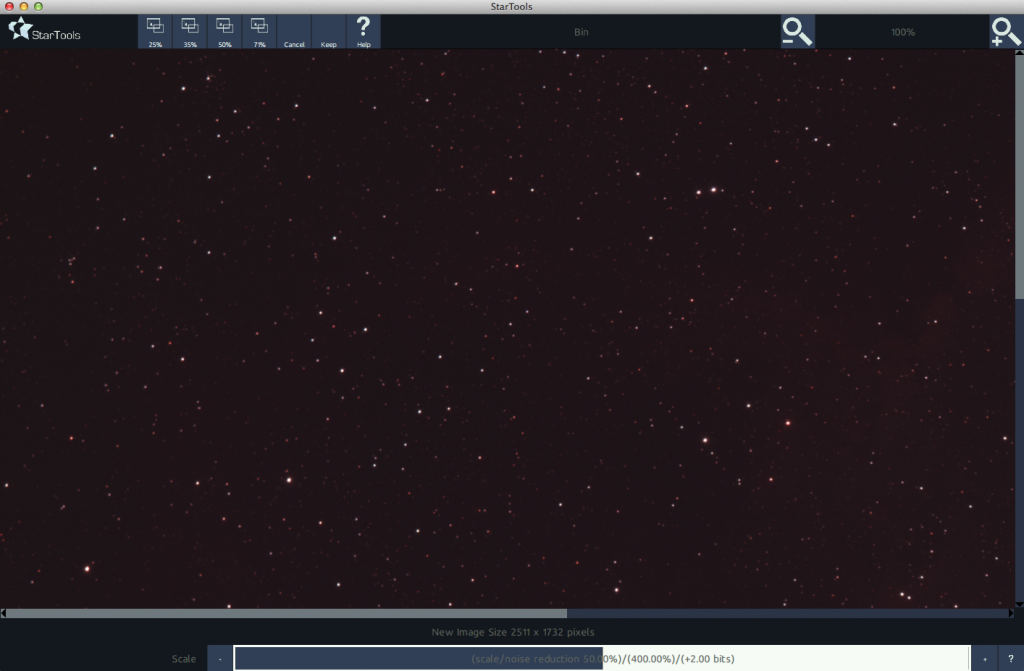
For this tutorial I binned to 50%, although at 35% I probably would still not lose any detail:
Pressing “Keep” accepts the result of the module.
Step 3: 1st AutoDev
It is time to see what our image contains. For this, we will click on AutoDevelop, which will automatically try to stretch our histogram in order to bring out any detail in the image. At this early stage, “any detail” will include a host of problems which will all become apparent in a horrible-looking display:
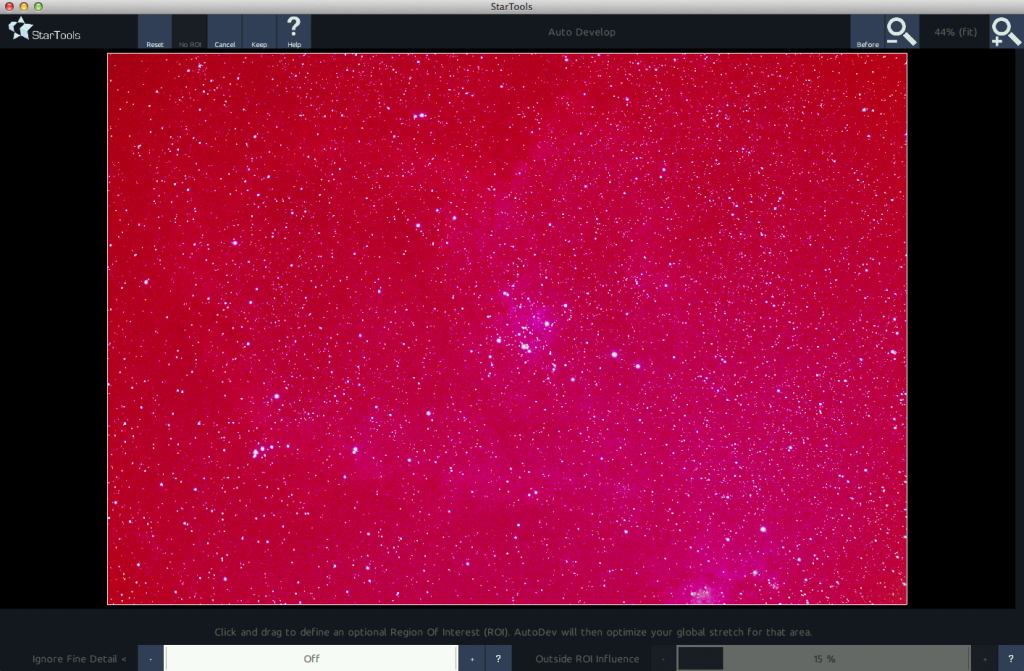
This is actually not too bad. The red background is a lot of light pollution. All StarTools previews are made so that any noise is shown regardless of your zoom level, so at this point any strange pattern noise on your image will show up on the zoomed out preview directly, I don’t have anything serious on this image though. The edge stacking artifacts are also very small on this image, often you will see a dark band around your frame, which will have to be cut out entirely on the next step. So we press Keep and continue.
Yes, we indeed “accepted” a very ugly result, but as you will find out StarTools is not destructive on our data, we can stretch our image using Develop, Contrast, HDR etc as many times as we want, to whatever values we wish and we don’t distort our original data like on other software.
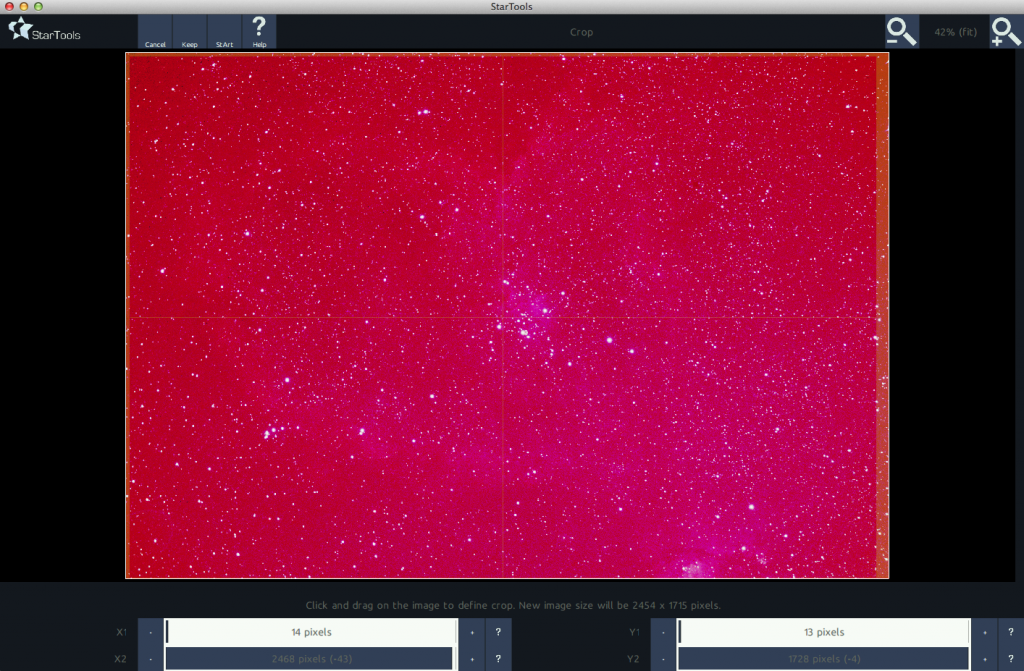
Step 4: Crop
You can crop by either dragging a rectangle, or using the bottom sliders. You should crop out any defects you see at the corners (on this image they are just 2-3 pixels wide), and you can also crop-out any area of the image that you are not interested in (I cut a bit more on the right for better centering):
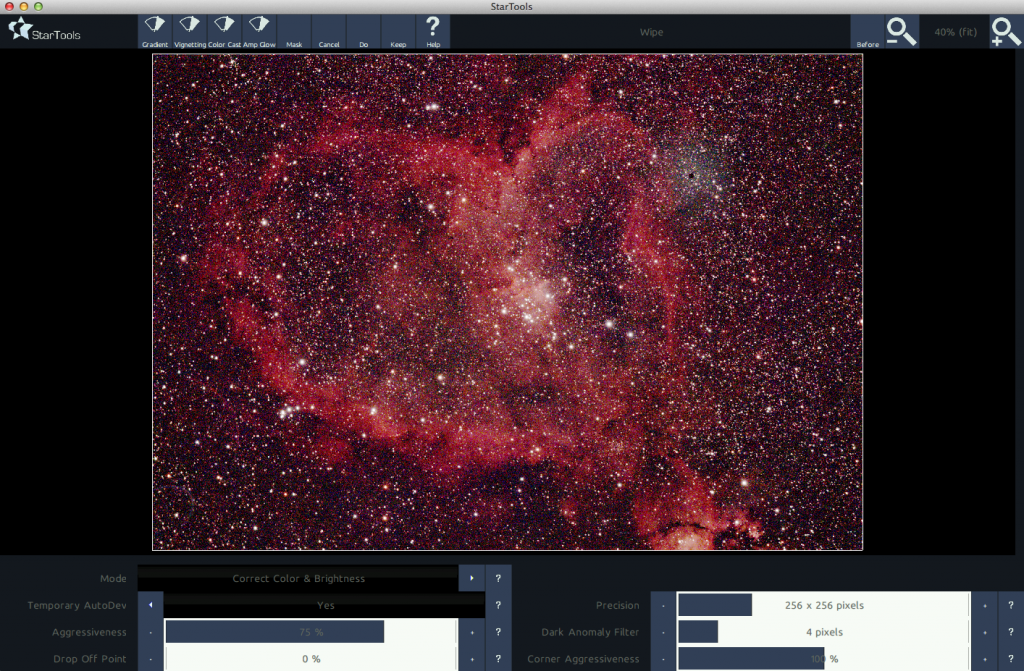
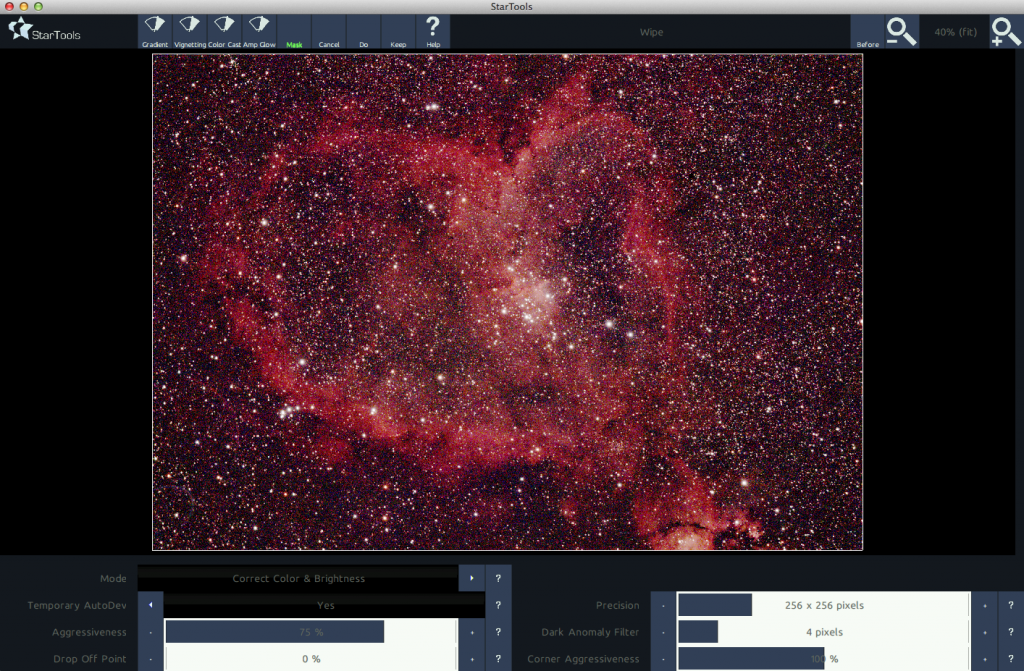
Step 5: Wipe
Probably the most important step. Hitting “Wipe” starts StarTools’ “Tracking” mode, which keeps track of your processing to learn how to intelligently reduce the noise in the image (which is always the last step) and also allows you some time-traveling of sorts (e.g. the Restore button will be enabled to allow you to go to various points of your processing). And Wipe will auto-magically take care of a lot of light pollution, gradients, even vignetting – careful, unlike many others, this module is only to be used once. The first thing you want to do on this screen, is to switch the “Temporary AutoDev” to “Yes” so that you can see a good preview of the result. Clicking the “Gradient” preset, which corresponds to a 75% “Aggressiveness” level will do a good job in many cases, although you might also want to increase a bit the “Dark Anomaly Filter” so that the software is not confused by tiny dark specs. I have found that “4” always works well for my 50% binned DSLR images, so perhaps you will find something that always work for your setup – you basically start increasing it until you stop seeing a benefit. If you still see a lot of background glow/patches/gradients etc throughout the image, you might want to increase the Aggressiveness. If you see such problems more towards the corners of the image than the center, you could switch to the “Vignetting” preset, which increases Aggressiveness to 100% for the edges, but keeps it a 75% at the center (and of course you can tweak further from that). In my image, I had to use the Vignetting preset, which gave me an (almost) excellent result:
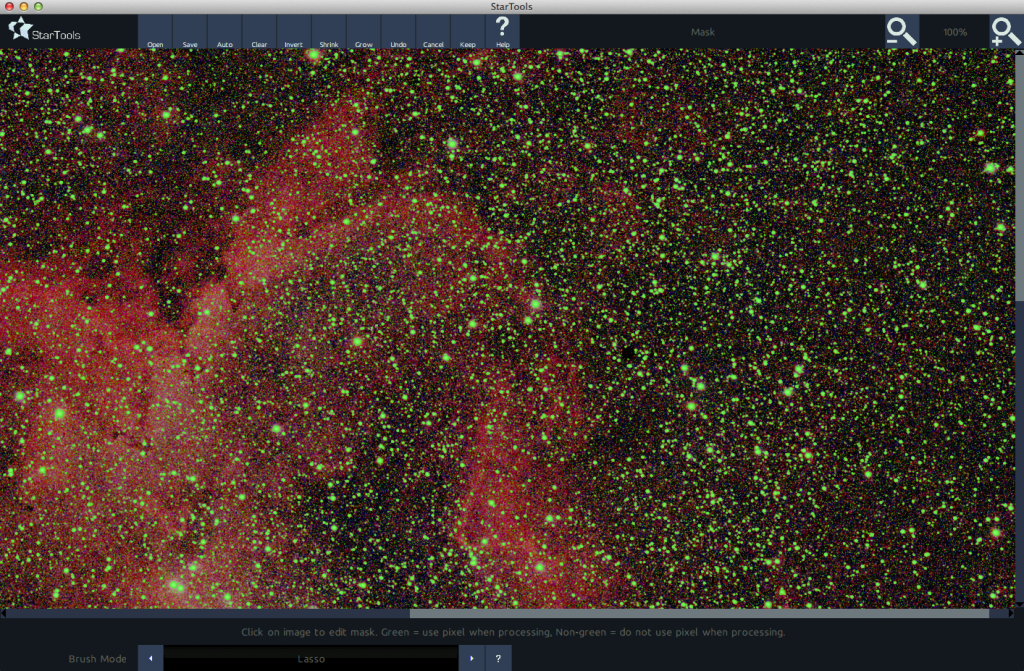
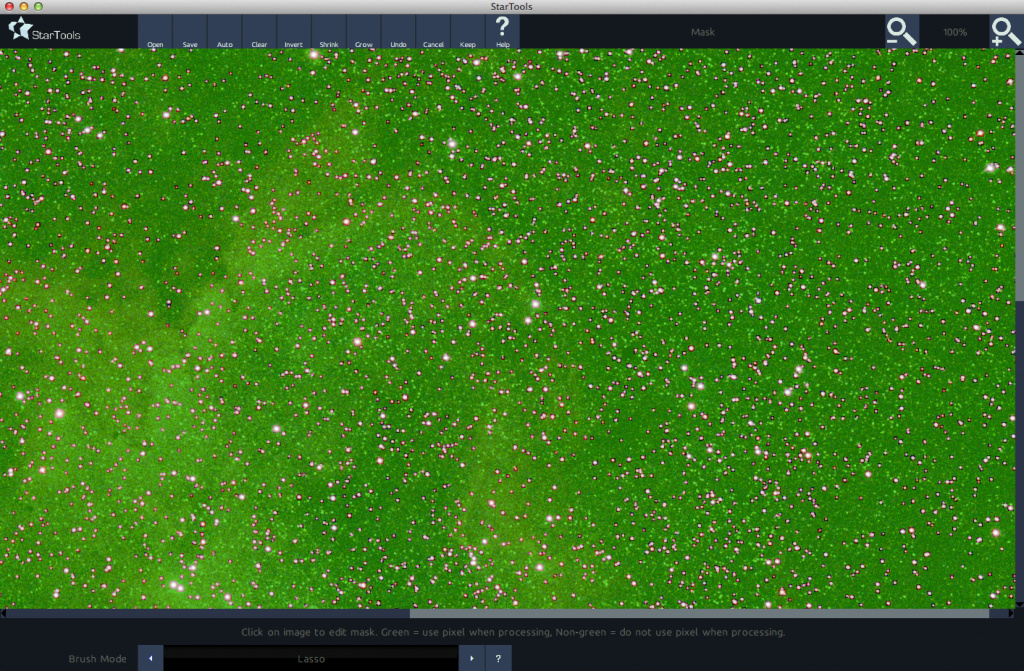
As you see, there is a dark spec that confuses Wipe and causes a halo around it (caused probably by a dust etc. particle in this case). If you see something like that, you have to tell Wipe to disregard it, and unless the problem is at the edge of the image where you could use the Crop module to cut it out, you will use a mask to do that. Clicking the Mask button will show a green semi-transparent overlay over our image. This is where the mask is “ON”, i.e. the parts of the image that Wipe will consider, which, by default, is the entire image. We can select the “Lasso” tool and make a circle around the little dark patch – be generous, you want the dark patch and a little more around it. If it is hard to see with the mask on, we can instead clear the mask (press “Clear”), then circle the dark patch with the Lasso tool, so now only the dark patch is “green”, but pressing “Invert” gives you what you want, the entire image green except the area of the dark patch:
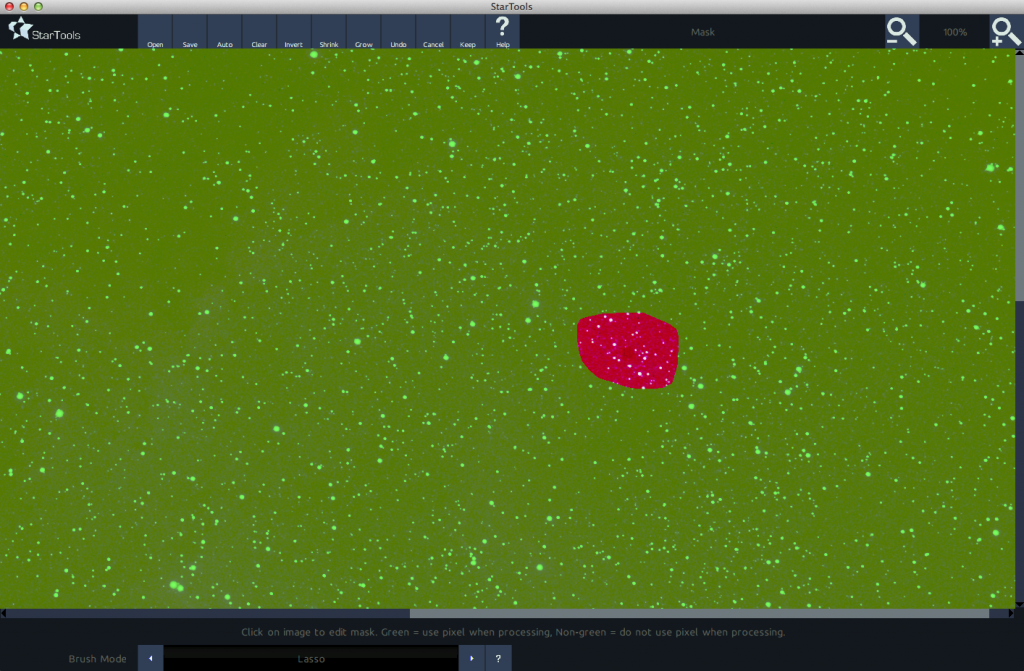
Press “Keep” for the mask, then “Do” again on Wipe and:
Note that if “Wipe” takes away faint parts of your object by confusing them for light pollution or gradients, you can edit the mask to EXCLUDE (i.e. not green in mask) these parts of your object (or the entire object if you wish), so that Wipe does not confuse them with things that have to “go”. In my experience, Wipe is not easily confused, but it depends on your data.
In any case, we got a good result, and we “Keep” it. Immediately the image becomes dark, this is because we were on a “temporary auto-dev”, so we’ll have to do the auto-dev for real.
Step 6: 2nd AutoDev
So, AutoDev will ask us what we want to do with the previous stretch (via AutoDev), so we click “Redo global stretch”. You can redo it as many times as you want as I mentioned, your original data is always there as far as StarTools is concerned.
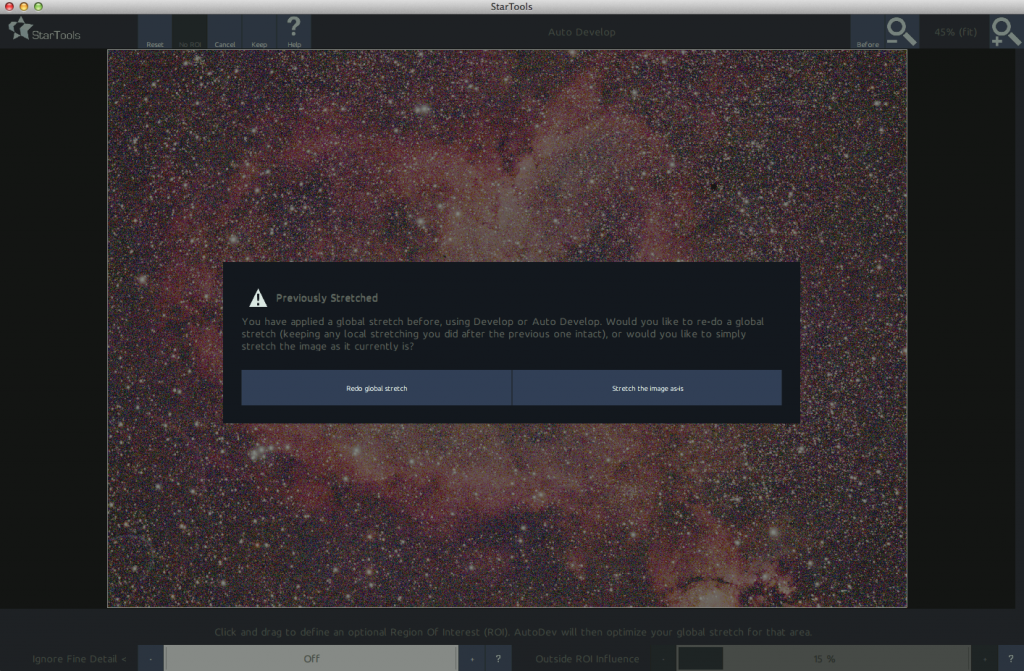
Unfortunately, AutoDev will try to bring out too much detail automatically and will not leave any dark sky bakground, so we’ll have to help it by dragging our mouse on the image to draw a rectangle of our “Region Of Interest” to show what our object is. So I make a rectangle at the core of the nebula:
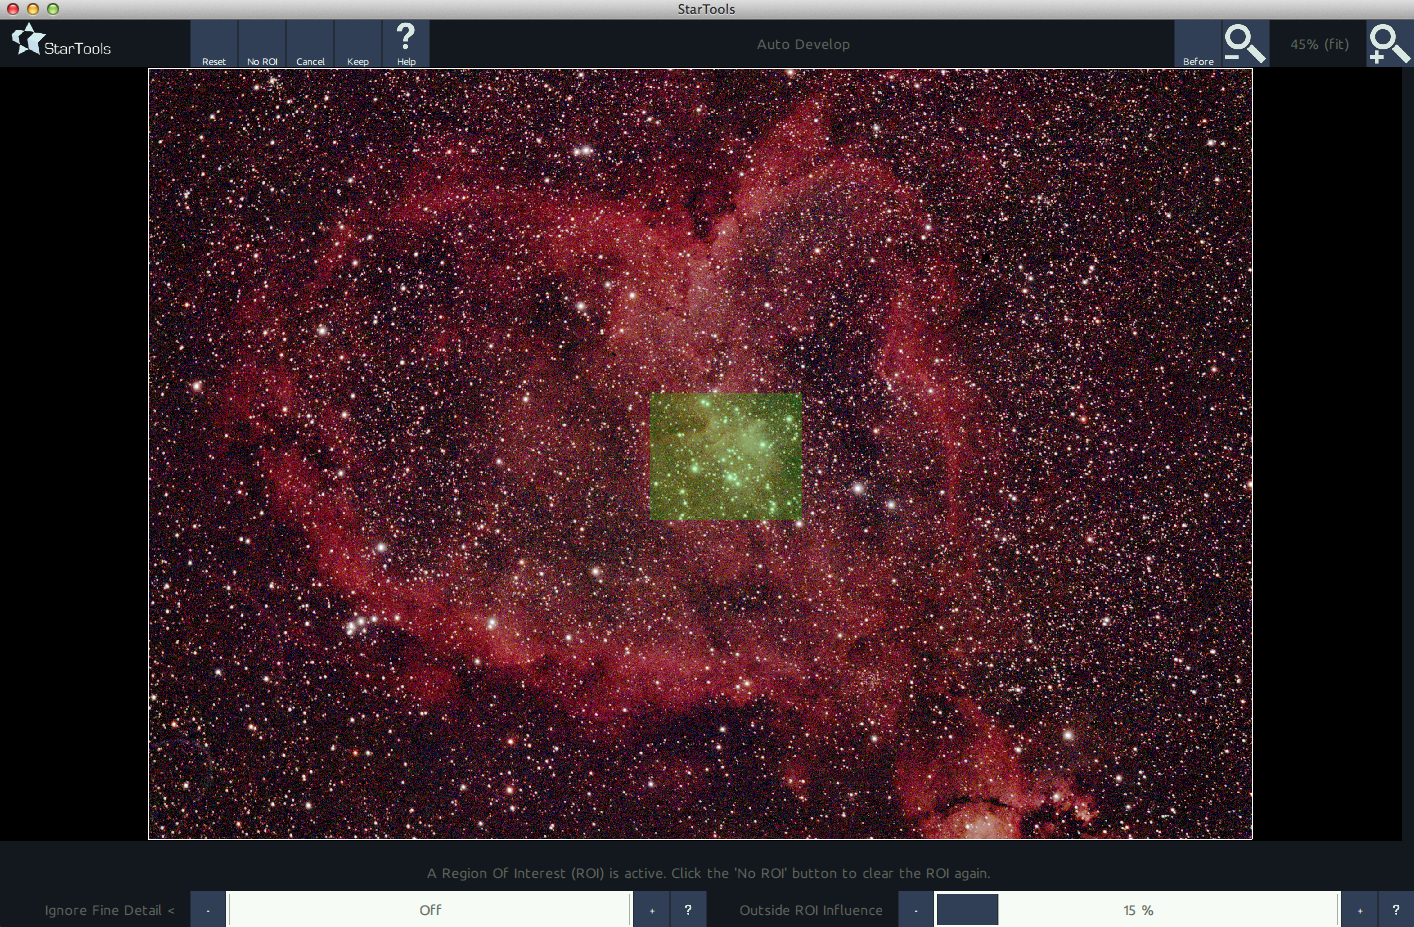
This works out. If you can’t get it to work with AutoDev exactly as you like it, you can also try the “Develop” module instead of the “Auto Dev”, where you basically just move the “Digital Development” slider to a position you like. AutoDev is a bit smarter and might achieve a better result, so try it first.
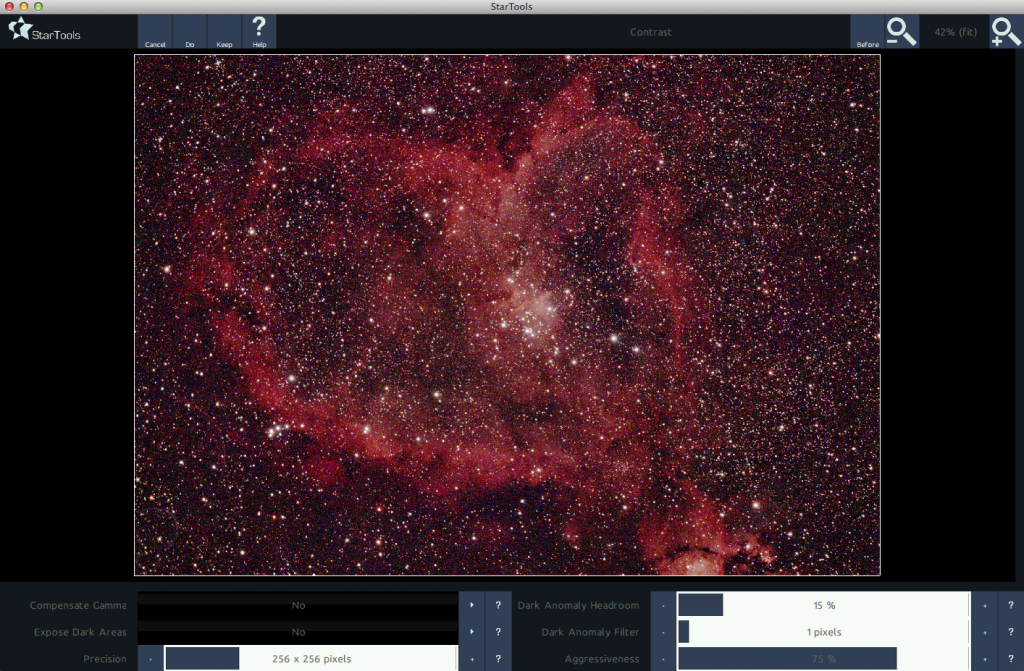
Step 7: Contrast
The Contrast module default settings usually help tame excessive glow and they indeed have a mild but beneficial effect on the image:
Step 8: HDR
HDR has several tools that help out bring out different details of the image. On this particular image, the “Optimize” tool will bring out more of the nebulosity. It will also bring out the stars a bit so we’ll have to be careful after that to not let them further overwhelm the image:
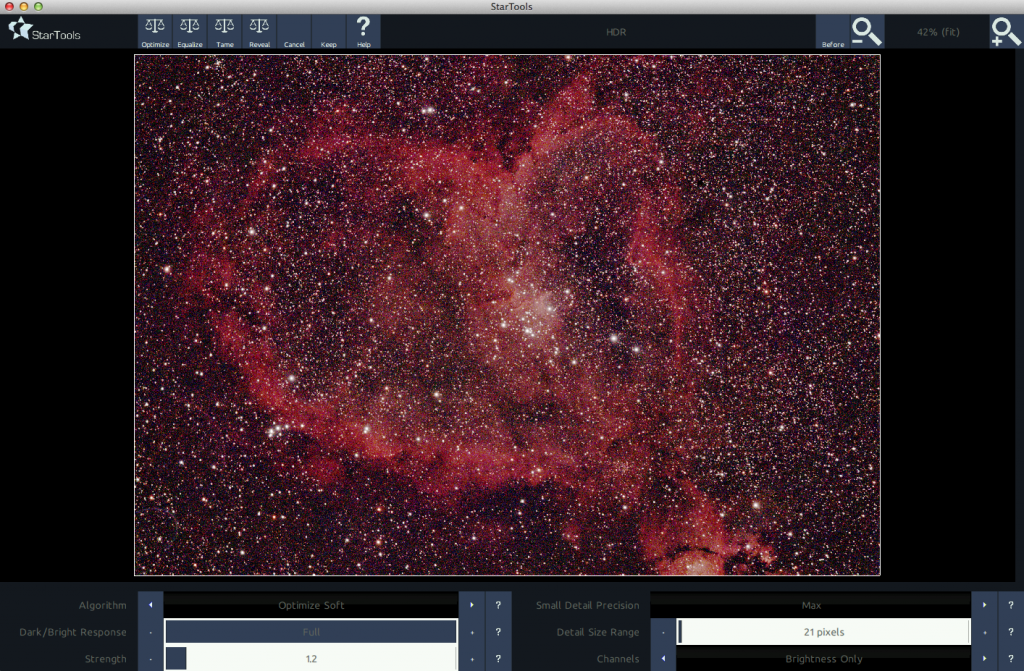
For other images the other tools are quite helpful: Tame can be used for very bright cores (e.g. the Orion Nebula core) which are near clipping, while Reveal can give you details in the core of your object (e.g. the center of a galaxy). You can always tweak the intensity of these tools by using the Strength and Dark/Bright response sliders. On the Heart Nebula we don’t need something else here.
Step 9: Decon
Deconvolution is a very powerful tool that tries to reverse the blurring caused by atmospheric turbulence. It cannot work on very bright objects, i.e. stars, because it will cause ringing artifacts, so we have to mask them out. The Decon module might ask us if we want it to create a mask automatically (if we don’t already have one), but we can decline and control the mask-creation process. So, we hit “Mask”, then “Auto” and we select the “Fat Stars” preset. This gives me this result:
It has picked up some tiny points as well, that probably aren’t stars, or if they are stars they won’t really be a problem. It is not too bad, so we can leave it, but if we improve the selection we can try “Fat Stars” again, but this time either set “Exclude color: Red” to avoid bright red nebulosity being confused for stars, and/or increase the “Filter Sensitivity”. Or, a quick solution is to press “Shrink”, which will get rid of all “stars” of 1 pixel size. In any case, whatever we choose to do (or not do), we have to press “Grow” at least 2 or 3 times so that the selection covers a bit around the stars as well to get a smooth transition. Then we hit “Invert” to get the mask that contains everything BUT the stars:
We keep the mask and Deconvolution is applied on the image. It takes some time, so we can drag an area to preview just a small part of the image if we prefer to test various settings, but for the sake of this tutorial let’s let it finish on the whole image with the defaults:
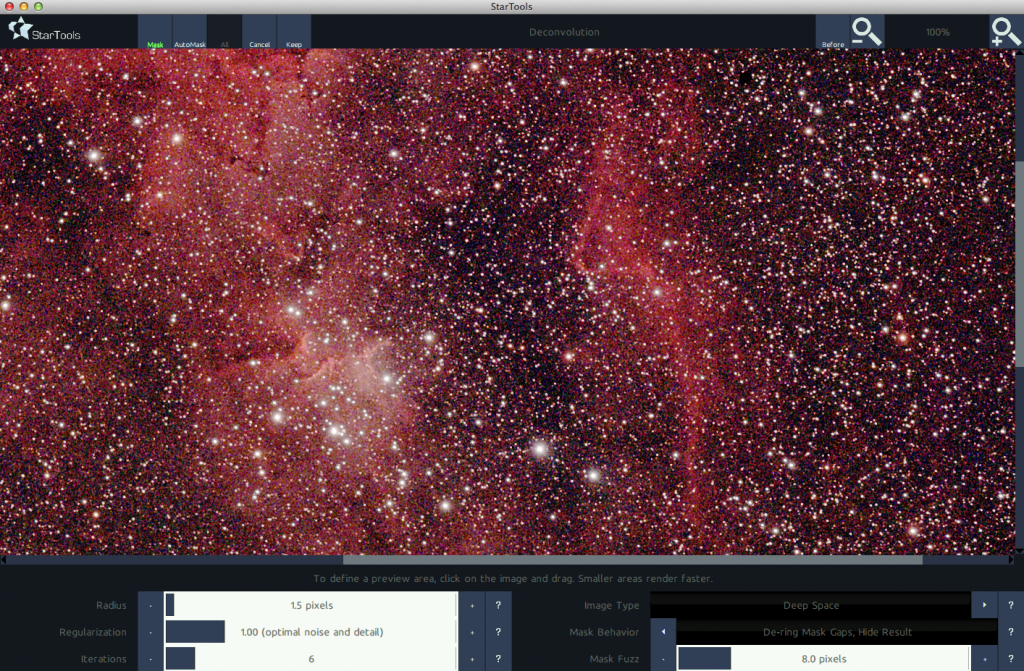
It has brought out some nice detail at the bright parts of the nebulosity. We could play a bit with the Radius and Regularization sliders to improve the result if we want, and we “Keep” the result we like.
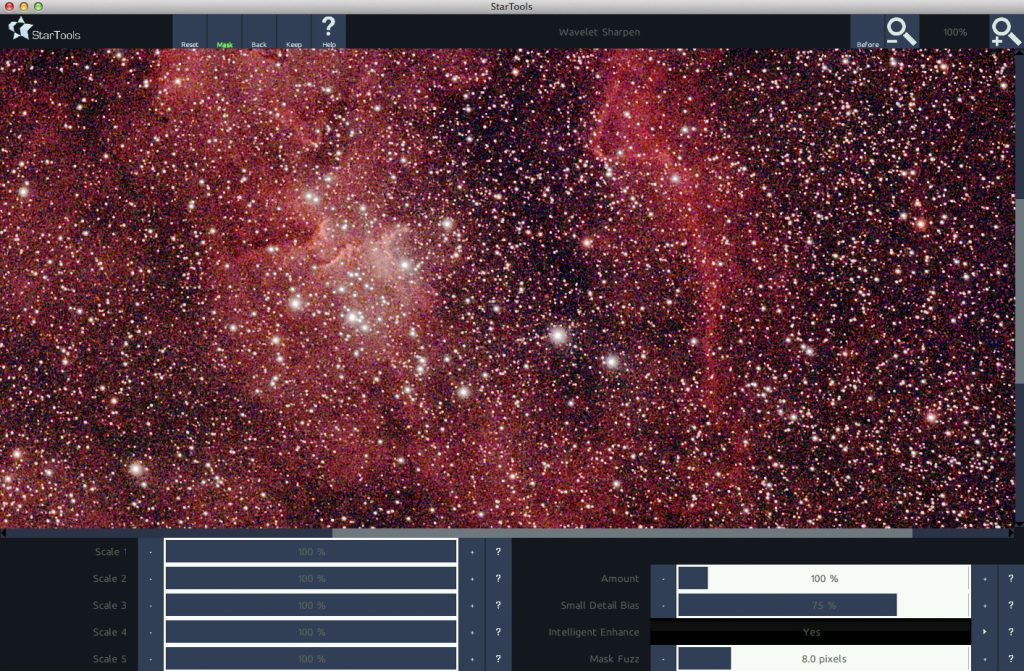
Step 10: Sharpening
The next step involves Wavelet Sharpening, which is another method of sharpening that does not apply specifically to atmospheric turbulence. It doesn’t matter if we do it before or after Decon, at least in my experience. However, if, like in this image, we don’t want it to make the stars more prominent by sharpening them, we leave them off the mask like we did in Decon. Note that Masks are kept until you change them, so we don’t have to recreate it. Sharpen gives us more defined central structures:
Step 11: Color
We turn to the Color module. It will ask as whether we want to fill the mask if we have one, to which we normally say yes. The module will at first try to automatically find the correct color balance. This usually gives us a useful starting point, but we, of course, will want to tweak it to our pleasing. In this particular image, for example, instead of “Scientific” (which aims at scientifically correct star colors), I switch to “Artistic, Detail Aware” style, which gave me a better start after increasing saturation, then increase “Dark Saturation” to give more color to the darker parts of the image (faint nebula), reduce the “Blue Bias Reduce” slider to give more emphasis to the blue, “Cap Green To Yellow” to get rid of some excess green, and end up with something like this:
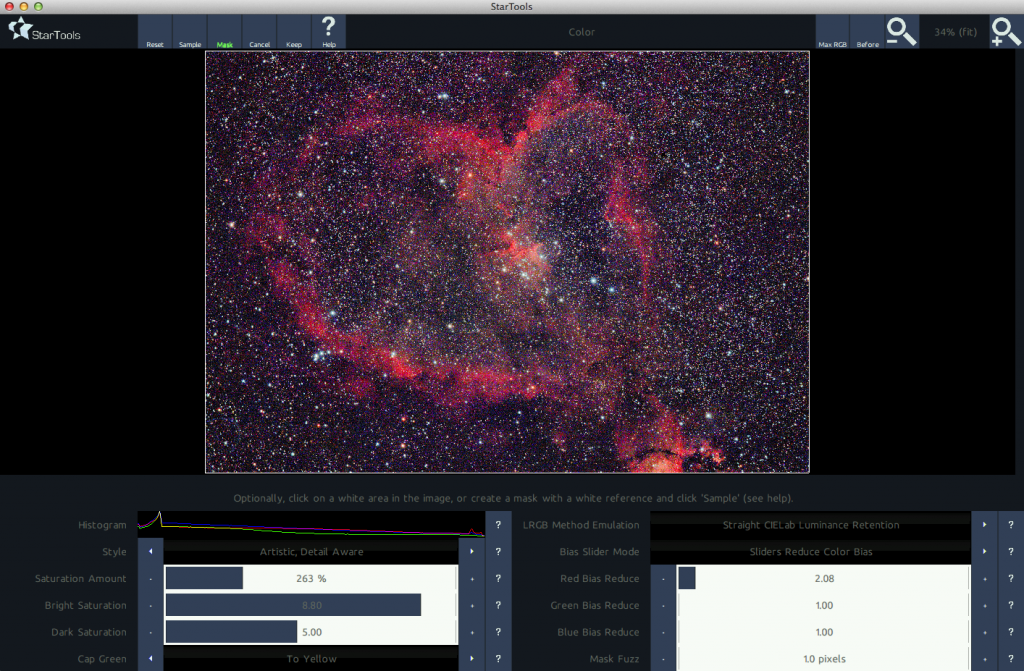
You can spend hours tweaking colors, besides, it is something entirely subjective. You can even apply the Color module to only part of your image if you want, in that case you use a mask. E.g. after processing the colors to your liking, if you want to make only your stars whiter, select them in a mask and run the Color module with lower saturation than before. Another useful feature is that if you know a point in the image that it should be exactly white (or gray), click on it and the module will use it to color balance.
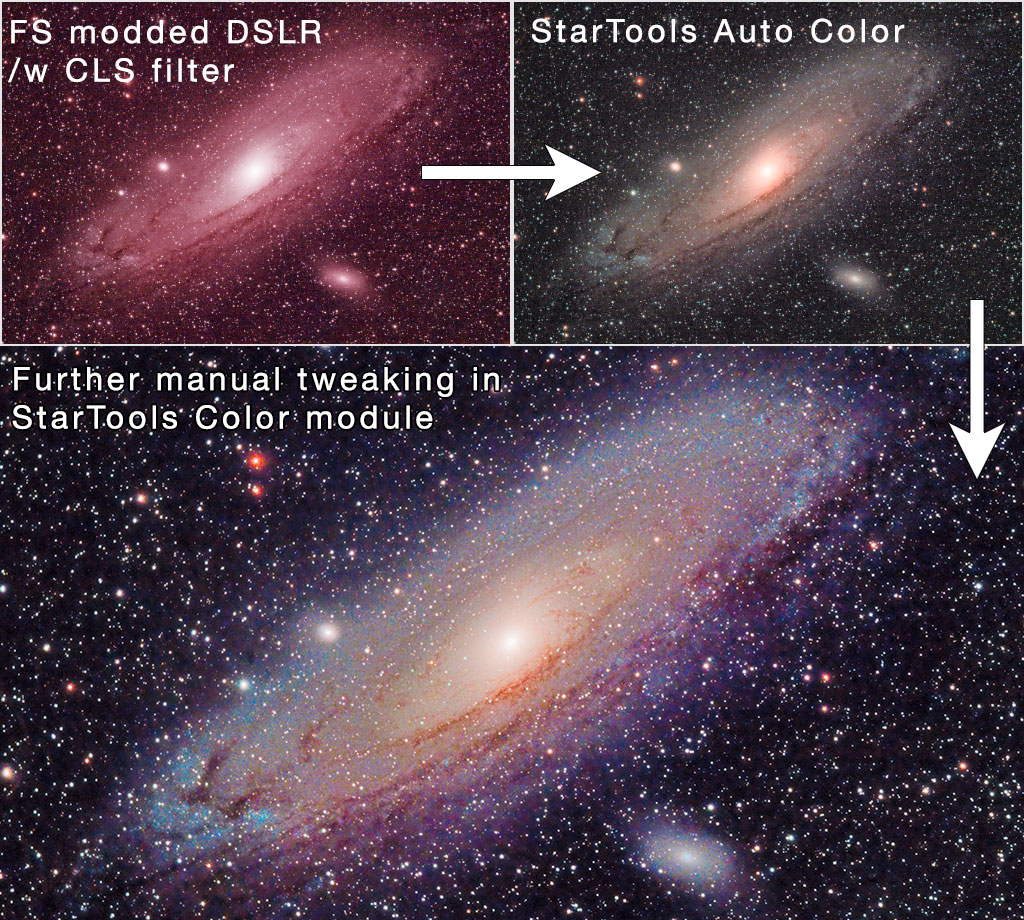
Even if you use filters like the CLS that heavily bias your colors, the Color module will usually help you get some proper colors. For example, shooting M31 through a CLS filter with a modded DSLR gives me an image that is pretty much purple. The Color module automatically gives me a yellow core and greenish outer galactic area, so then it is easy for me to shift it more towards to the bluish that pleases me more:
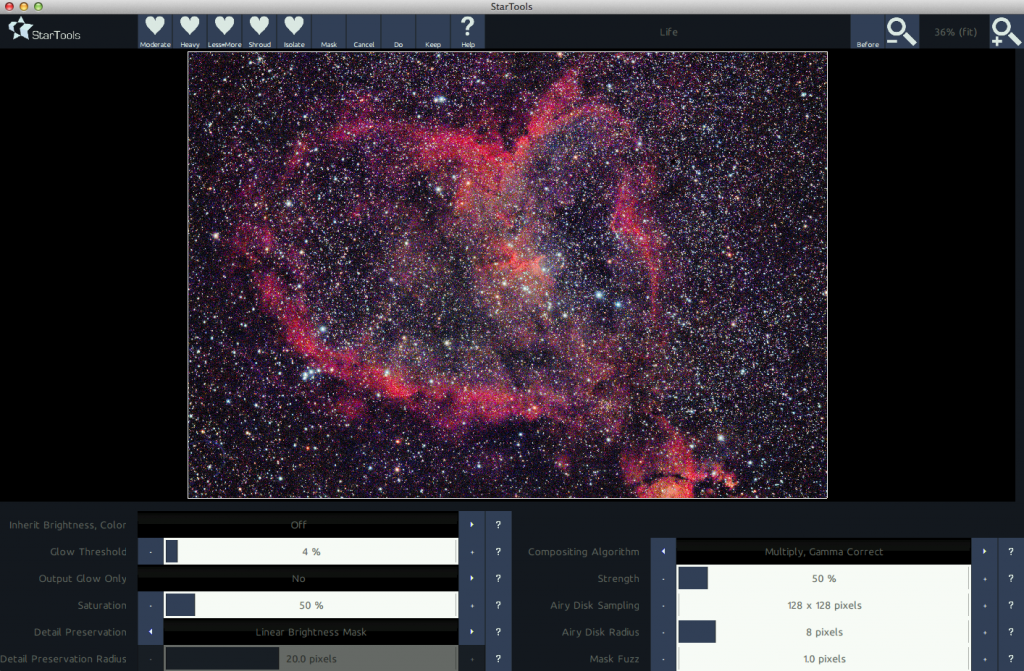
Step 12: Life
Here is a module that is considered pretty optional, but, as its name implies, it can breathe some “life” to your images so it is worth trying out. The Life module has five presets. The first one, “Moderate” is similar to a complicated process usually called “Power Of Inverse Matrix” in other software, but here it is done automatically and can make the less bright parts of your image shine more, which works out well in this image:
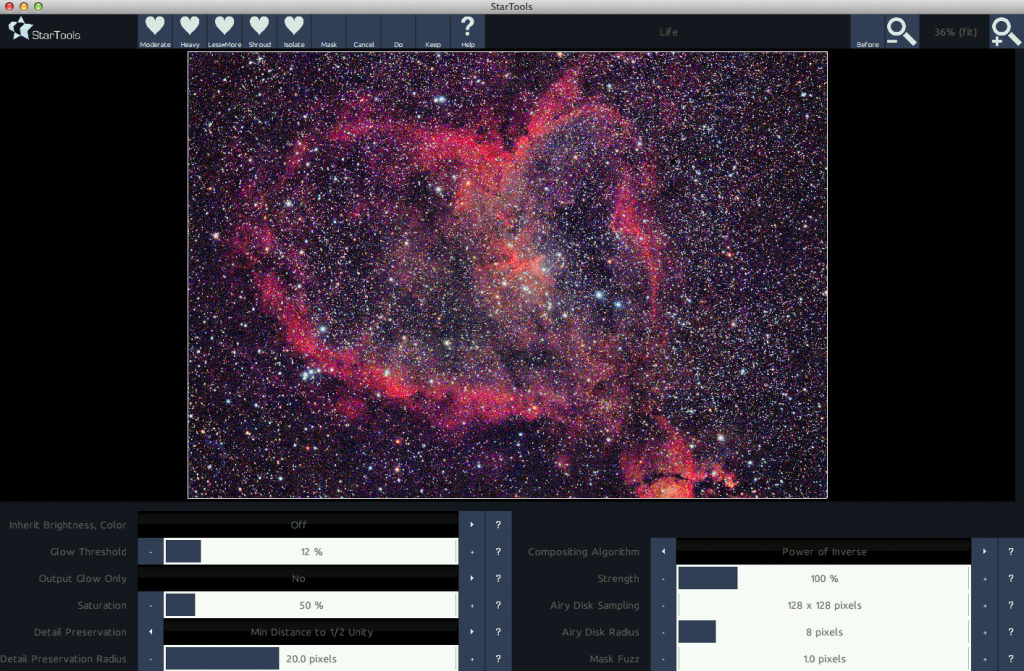
You could adjust the parameters, of if you wanted a stronger effect you could do the “More” preset. “Keep” if you like something. On the other hand, if the image is starting to become a bit overwhelming, with the dark sky areas full of bright noise etc, you might want to use the Less4More preset, or, if you have a well defined object (e.g. galaxy, planetary nebula), select it in a mask and run the “Isolate” preset with a sufficient Mask Fuzz that makes it look natural. In this case we don’t have a well-defined object, so we give a try to the Less4More preset, which does give us a darker sky:
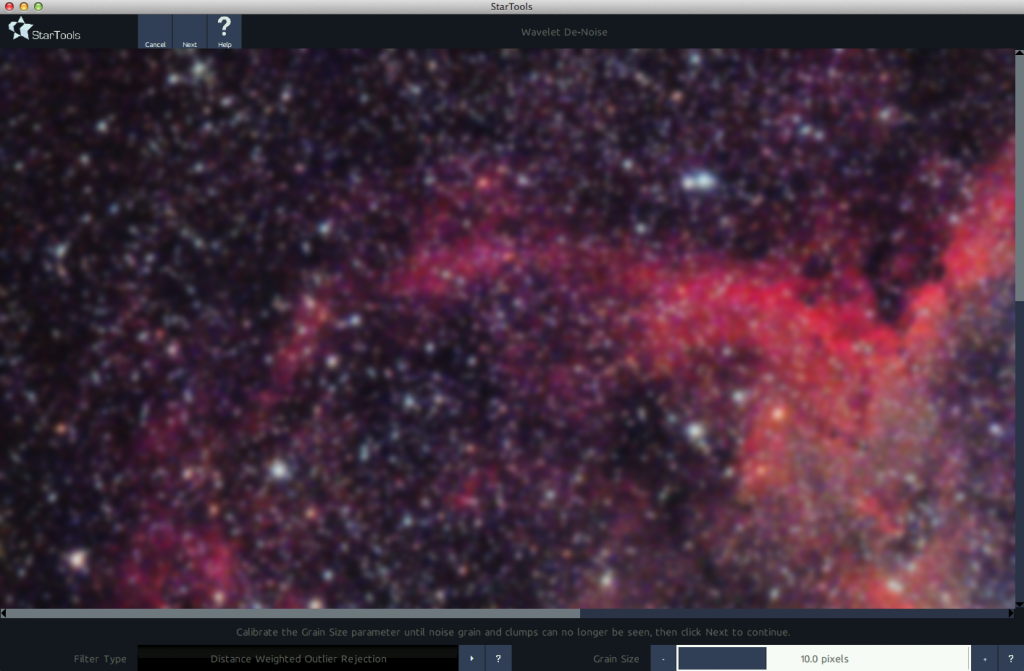
Step 13: Final Noise Reduction
As a final step, we click the “Track” button on the top to stop Tracking and we are asked whether we want noise reduction – which we sure do! StarTools will first ask us for a grain size large enough that any noise is blurred. Don’t worry about your selection, you can change it again in the next screen – so just hit “Next” after selecting a value that looks blurry enough:
StarTools will start applying all the knowledge it gathered during your processing of your image. Depending the image size and CPU speed you might wait a bit at this point. In the end, you will get a screen with the noise reduction parameters, you can define a rectangle (click and drag with your mouse) to apply a preview on so that you can see the results of your changes faster:
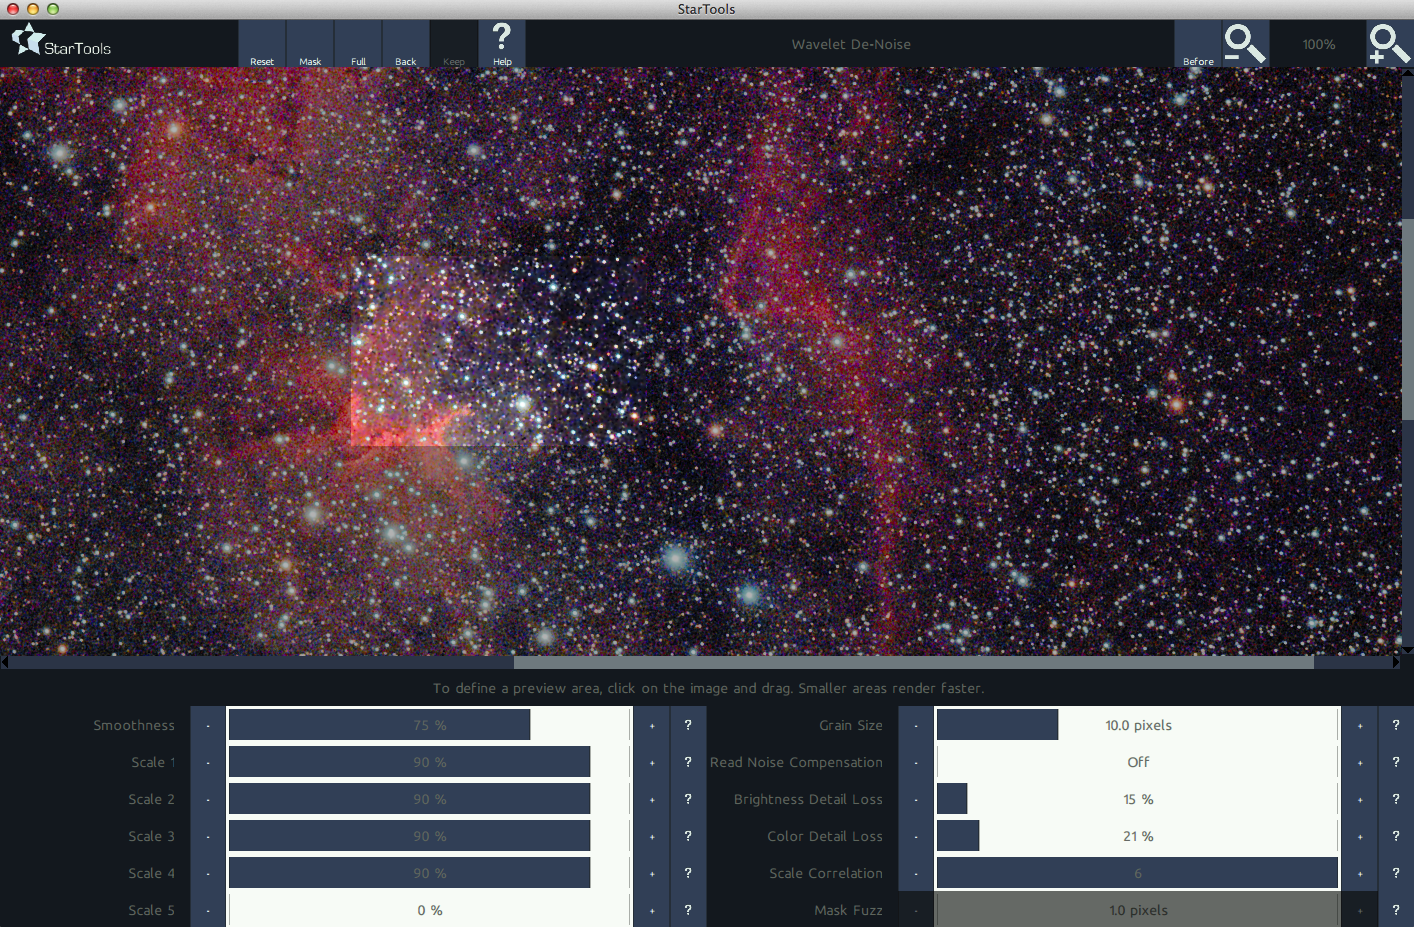
The defaults work for cases where there is not too much noise. If they don’t get rid of enough noise, you can start increasing Brightness & Color Detail Loss. If you still have a lot of noise at the core of your object, but it is smooth further away from it, you can try reducing Scale Correlation. If on the other hand you still have background noise you can try increasing Read Noise Compensation (or increase Smoothness). This requires a bit trial and error and depends both on your image and your personal taste.
In the end “Keep” the result, at which point you will return to the main program screen where you can “Save”, or use one of the extra tools that were enabled after noise reduction. These tools are more of a “gray area” since they will manipulate specific parts of the image, so I don’t like to use them myself, but they are available. For example “Magic” can make your stars tighter, “Repair” can help you make your stars affected by trailing more round, “Heal” can fix bad patches etc.
Note that the “save” dialogue does not ask you what type of file you want to save. It is up to you to type a name with the extension you want, e.g. “heart.jpg” will save a JPEG, “heart.tif” will save a TIFF, while “heart.fts” will save a FITS file.
Remember that there is no “correct” workflow for StarTools, users usually find what works for them after experimenting. The above workflow was used for a demonstration at the Heaton Park Astronomy Group, as most people there use DSLRs under relatively light-polluted skies (same skies as this Heart Nebula image), but it is always a good idea to see other workflows demonstrated, e.g. at the StarTools video tutorials Youtube channel.
Quick Example Videos
Friends beginning with StarTools sometimes ask me for advice on a specific image, and the easiest reply is often with a quick video. Note that StarTools writes your processing steps on a log (startools.log, in the application folder), so you can use that to share your process, but some things like selecting areas in AutoDev etc are not recorded. In any case here are some short videos dealing with specific issues (you’ll want to enable Closed Captions):
JPEG Stack

In the above video, JPEG was shot by accident instead of RAW. This means that the stack did not have the original linear data that StarTools expects, so we will ask it to attempt to reverse the stretch before processing. It does quite well here, as M42 is an easy object, but JPEG would not cut it for a “hard” object. Switch on subtitles for narration.
4min Globular Cluster

This is a video of M13 processed in just 4 minutes. Normally I would spend a little more time to improve the result, but the point was to quickly demonstrate how the HDR Reveal preset helps bring out the central stars, and Decon the stars just outside the center. Switch on subtitles for narration.
This is one of the best tutorials I have ever read, for any program. Very well done!
Glad you like it and thanks!
Yes it is excellent, I gave up on startools because I couldn’t figure out what on earth it was doing and the tutorials I found were all very confusing.
After reading this I shall try it again.
Very good run down of startools thanks for compiling
Great tutorial. It’s nice to have a greater understanding on the meanings of each of the processes.
A valuable tool in my Startool’s process.
Thank you for posting.
Fab tutorial thanks.
I have just downloaded the trial version and will use this to try out the program, looks promising.
Thanks
I found this when I was looking for Tutorials on StarTools, and I’ve been linking it to Cloudy Nights forum for those people who are starting out.
What I really would like to see, if possible, is an in-depth description of each module. I’m not sure what Deconvolution does, or Flux or any number of other things, and it would be great to have a basic understanding of ‘What’, ‘Why’ and ‘How’ so we can use those tools more effectively.
TIA!
Hello Gary, I’m glad you found the tutorial helpful. It is intended as a quick guide for beginners to get results, if you want more details on specific modules one reference I would suggest is the “unofficial ST 1.3.5 user manual“. Although it covers the older version, most modules should be quite similar, at least in the what/why department.
This is great! Well done!!!
Thanks!
Excellent tutorial. I was getting a bit frustrated with Startools, and it turns out that I was processing the already adjusted image from DDS rather than the auto save. That tip, and a lot of others made for a much better experience. Nicely done!
Thank you very much for a very informative tutorial on Star Tools as well as DSS settings. This is incredibly helpful to me!
You’re welcome!
Great Tutorial, tried it with shot of Pleiades and got good results except that Startools made my stars fat. My stacked version had pinpoint stars but in the processed version they got fat. Tried masking all stars before autodev, a bit better. Any ideas.
Max
Hi Max. At which step do your stars get fat? If it is at autodev, then make sure you develop less, e.g. by dragging a square around Maia (the star) to guide autodev. Or you could also use develop instead of autodev. You can also check the StarTools forum where there is an Image Processing troubleshooting section, where people post the photos they have problems with and get help directly for that image.
Hi, Excellent presentation, not only for StarTools, but for DSS too, well done.
Phil
Glad you liked it Phil.
Thanks so much for this tutorial, especially the detailed description of lights and darks etc. at the beginning. Bookmarked for when I get chance to try and shoot some nebulae!
Thanks for sharing this, it’s brilliant. I’d just about given up with StarTools but you have shown me how to get good results with it. I’m really impressed, thanks again.
Glad I could help.
Great video tutorial! Anyway to retrieve the image so I can practice? The supplied link doesn’t work.
Ah, thanks for pointing it out. Stupid of me to use my google drive, on the first cleanup I had completely forgotten about that file being linked to! I setup a more permanent link now. Cheers!
Got it ! Thanks, now to practice.
Great tutorial! Thanks for your time and invaluable help with getting to understand StarTools more…
Congratulations on an easy to follow and clear tutorial. I was actually reading this on one computer while following the directions on a download of StarTools on another! Thank you for uploading.
You’re welcome!
Thanks for the tutorial. I used most of this information on M31, but that’s the only data I had. I’m still very new but it helped a lot.
As someone who has used StarTools (ST) for around three years and spent hundreds of hours procesing images this is an excellent introduction (and some more) into using StarTools. It will help many users produce good images from their data and act as a starting point for further experimentation with other ST’s modules such a LAYER and HEAL.
Well done.
Thanks Steve, it helps that with this software you can start getting good results even with a basic workflow that uses many defaults.
Having been struggling with understanding post-processing, I saw Ivo Jager’s StarTools demo on YouTube and a lot of what is supposed to be happening and why ‘under the covers’ of post-processing software so much easier to understand. So I grabbed a copy and found this tutorial and the DSLR tips and run-through truly illuminating 😉 I reprocessed some old data following these steps and the results were _so_ much better than any previous attempts.
Great job.
Happy to help!
This is wonderful. Thank you. Do you by any chance have the same with the new 1.5 modules?
Hi, thanks for the feedback. I may do an updated one in the future, but in general I’d think StarTools hasn’t changed that much in v1.5 – perhaps you can recommend 1.5 features you think the guide should cover? Thanks.
Thanks, this is great. By coincidence I recently recorded my first ever Astro image using M13 as an easy target. I used StarTools without a great understanding of what I was doing, but got a reasonably satisfying result. I now intend to follow the procedure you showed in your M13 video to see the difference when I do it properly. Thanks again, this is a really clear explanation of how to use the different options.
You’re welcome and good luck with your processing!
This is a fantastic tutorial. Have only recently downloaded StarTools to try and will follow this step by step starting by restocking in DSS.
Thanks so much
Thanks so much! I just followed it through as an intro to StarTools. Mine doesn’t look quite as good, but still looks really great! I’m gonna do it again later this week and see how it compares once I have some practice in.
Quote “Don’t convert your RAW to TIFF (or anything else) before stacking, at least not with any regular software like Canon’s own or Adobe etc. If you know what you are doing, software like DCRAW can be used to convert to Linear 16-bit TIFF (with the caveat that calibration is more accurate on RAW i.e. before debayering)”Unquote.
My files will be in DNG format Pentax camera, I have been trying to get to grips with DCRaw, which is no longer being developed, I could not get the original version of DCRaw to run in Windows 10, I do understand that this needs to be done. A great article, thank you, I am keen to try and process further.
Can you offer some solution, direct me where to look, how to convert DNG files to linear 16 bit TIFF files to use in DSS?
Hi. I haven’t need to convert DNG images in years, and I am not really a Windows person anyway, so I am afraid I won’t be able to help. If you use StarTools, the StarTools’ own forum might be the place to ask, otherwise perhaps cloudynights.com. Good luck!